以下测试仅在 **JetPack** **6.1 (rev1)** 和 **JetPack 5.1.5** 版本中通过验证
调整功耗上限: ```bash sudo nvpmodel -m 2 #nano 模式2为super sudo jetson_clocks --fan ``` cpu压力测试: ```bash sudo apt install stress stress --cpu 8 --io 4 --vm 2 --vm-bytes 128M --hdd 1 --hdd-bytes 1024M ``` gpu压力测试: ```bash git clone https://github.com/anseeto/jetson-gpu-burn/ cd jetson-gpu-burn make ./gpu_burn 100000 ``` 状态查询: ```bash sudo jtop ``` [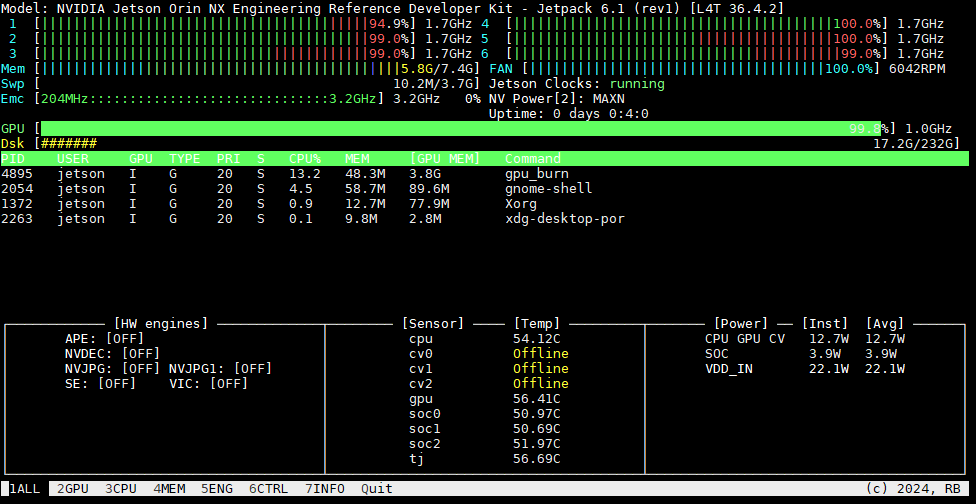](https://www.linkzeelabs.com/wiki/uploads/images/gallery/2025-07/f1dimage.png) > Orin Nano 整机最大功率为**30W.** > > Orin NX 整机最大功率为**40W**. # 编译安装opencv with cudaJetPack预装的opencv没有启用cuda,需要自行编译安装。
[](https://www.linkzeelabs.com/wiki/uploads/images/gallery/2025-07/g2Timage.png) #### 1. 脚本一键安装 ```bash #!/bin/bash # opencv_install.sh # Modified from https://github.com/AastaNV/JEP/blob/master/script/install_opencv4.10.0_Jetpack6.1.sh version="4.10.0" folder="workspace" remove_old="" set -e # Parse command-line arguments for arg in "$@"; do case $arg in --version=*) version="${arg#*=}" ;; --folder=*) folder="${arg#*=}" ;; --remove-old=*) remove_old="${arg#*=}" ;; --help|-h) echo "Usage: $0 [--version=4.x.x] [--folder=dir] [--remove-old=yes/no]" exit 0 ;; *) echo "Unknown parameter: $arg" echo "Usage: $0 [--version=4.x.x] [--folder=dir] [--remove-old=yes/no]" exit 1 ;; esac done # Create installation directory if it doesn't exist if [ ! -d "$folder" ]; then echo "Creating directory: $folder" mkdir -p "$folder" fi cd "$folder" || exit # Old OpenCV removal logic if [ -z "$remove_old" ]; then read -rp "Do you want to remove system-installed OpenCV? (yes/no): " remove_old fi case "$remove_old" in [yY] | [yY][eE][sS]) echo "** Removing system OpenCV packages" sudo apt -y purge *libopencv* sudo apt -y autoremove ;; *) echo "** Skipping system OpenCV removal" ;; esac echo "------------------------------------" echo "** Installing dependencies (1/4)" echo "------------------------------------" sudo apt-get update sudo apt-get install -y build-essential cmake git libgtk2.0-dev pkg-config \ libavcodec-dev libavformat-dev libswscale-dev libgstreamer1.0-dev \ libgstreamer-plugins-base1.0-dev python3-dev python3-numpy libtbb2 \ libtbb-dev libjpeg-dev libpng-dev libtiff-dev libv4l-dev v4l-utils qv4l2 curl # Verify essential dependencies installed for dep in g++ cmake git pkg-config; do if ! command -v "$dep" > /dev/null; then echo "Error: $dep installation failed" exit 1 fi done echo "------------------------------------" echo "** Downloading OpenCV ${version} (2/4)" echo "------------------------------------" # Check if source files already exist download_opencv=false download_contrib=false if [ ! -f "opencv-${version}.zip" ]; then echo "Downloading opencv-${version}.zip" wget -O opencv-${version}.zip https://github.com/opencv/opencv/archive/${version}.zip || { echo "Download failed! Check your internet connection or verify the version exists" exit 1 } download_opencv=true else echo "opencv-${version}.zip exists, skipping download" fi if [ ! -f "opencv_contrib-${version}.zip" ]; then echo "Downloading opencv_contrib-${version}.zip" wget -O opencv_contrib-${version}.zip https://github.com/opencv/opencv_contrib/archive/${version}.zip || { echo "Download failed! Check your internet connection or verify the version exists" exit 1 } download_contrib=true else echo "opencv_contrib-${version}.zip exists, skipping download" fi # Unpack source files if [ ! -d "opencv-${version}" ] || $download_opencv; then if [ -d "opencv-${version}" ]; then echo "Removing existing opencv-${version} directory" rm -rf "opencv-${version}" fi echo "Unpacking opencv-${version}.zip" unzip -q opencv-${version}.zip || { echo "Extraction failed! File may be corrupt" exit 1 } fi if [ ! -d "opencv_contrib-${version}" ] || $download_contrib; then if [ -d "opencv_contrib-${version}" ]; then echo "Removing existing opencv_contrib-${version} directory" rm -rf "opencv_contrib-${version}" fi echo "Unpacking opencv_contrib-${version}.zip" unzip -q opencv_contrib-${version}.zip || { echo "Extraction failed! File may be corrupt" exit 1 } fi # Clean up zip files after successful extraction if [ $? -eq 0 ]; then rm -f opencv-${version}.zip opencv_contrib-${version}.zip fi cd opencv-${version} || exit echo "------------------------------------" echo "** Building OpenCV ${version} (3/4)" echo "------------------------------------" mkdir -p release cd release # Auto-detect CUDA architecture cuda_arch="" if command -v nvidia-smi &> /dev/null; then gpu_name=$(nvidia-smi --query-gpu=name --format=csv,noheader | head -n1) if [[ $gpu_name == *"Orin"* ]] || [[ $gpu_name == *"Jetson"* ]]; then cuda_arch="8.7" elif [[ $gpu_name == *"A100"* ]]; then cuda_arch="8.0" fi fi cmake_cmd="cmake -D WITH_CUDA=ON -D WITH_CUDNN=ON -D OPENCV_GENERATE_PKGCONFIG=ON " cmake_cmd+="-D OPENCV_EXTRA_MODULES_PATH=../../opencv_contrib-${version}/modules " cmake_cmd+="-D WITH_GSTREAMER=ON -D WITH_LIBV4L=ON -D BUILD_opencv_python3=ON " cmake_cmd+="-D BUILD_TESTS=OFF -D BUILD_PERF_TESTS=OFF -D BUILD_EXAMPLES=OFF " cmake_cmd+="-D CMAKE_BUILD_TYPE=RELEASE -D CMAKE_INSTALL_PREFIX=/usr/local " # Add CUDA architecture if detected if [ -n "$cuda_arch" ]; then echo "Detected NVIDIA GPU: ${gpu_name}, using CUDA_ARCH_BIN=${cuda_arch}" cmake_cmd+="-D CUDA_ARCH_BIN=${cuda_arch} -D CUDA_ARCH_PTX=\"\" " else echo "No supported GPU detected, skipping CUDA architecture flags" fi # Execute CMake configuration echo "CMake command: $cmake_cmd .." $cmake_cmd .. || { echo "CMake configuration failed" exit 1 } # Parallel build (leave one core for system stability) cpu_cores=$(($(nproc) - 1)) [ $cpu_cores -lt 1 ] && cpu_cores=1 echo "Building with ${cpu_cores} CPU cores" make -j${cpu_cores} || { echo "Compilation failed" exit 1 } echo "------------------------------------" echo "** Installing OpenCV ${version} (4/4)" echo "------------------------------------" sudo make install || { echo "Installation failed" exit 1 } # Add environment variables to .bashrc (only if not already present) bashrc=~/.bashrc env_lines=( "export LD_LIBRARY_PATH=/usr/local/lib:\$LD_LIBRARY_PATH" "export PYTHONPATH=/usr/local/lib/python3.10/site-packages/:\$PYTHONPATH" ) for line in "${env_lines[@]}"; do if ! grep -Fxq "$line" "$bashrc"; then echo "Adding to .bashrc: $line" echo "$line" >> "$bashrc" else echo "Environment variable already exists: $line" fi done source ~/.bashrc echo "** OpenCV ${version} installation completed" echo "Verification commands:" echo " pkg-config --modversion opencv4" echo " python3 -c 'import cv2; print(cv2.__version__)'" echo "** Installation successful!" ``` #### 2. 手动安装 2.1 卸载自带opencv ```bash sudo apt-get purge libopencv* sudo apt autoremove sudo apt-get update ``` 2.2 安装前置软件包 ```bash sudo apt-get update sudo apt-get install -y build-essential cmake git libgtk2.0-dev pkg-config libavcodec-dev libavformat-dev libswscale-dev sudo apt-get install -y libgstreamer1.0-dev libgstreamer-plugins-base1.0-dev python3.10-dev python3-numpy sudo apt-get install -y libtbb2 libtbb-dev libjpeg-dev libpng-dev libtiff-dev libv4l-dev v4l-utils qv4l2 sudo apt-get install -y curl ``` 2.3 获取opencv源码(以4.10.0版本为例) ```bash version=4.10.0 wget -O "opencv-${version}.zip" "https://github.com/opencv/opencv/archive/${version}.zip" wget -O "opencv_contrib-${version}.zip" "https://github.com/opencv/opencv_contrib/archive/${version}.zip" unzip "opencv-${version}.zip" unzip "opencv_contrib-${version}.zip" rm "opencv-${version}.zip" "opencv_contrib-${version}.zip" cd "opencv-${version}/" ``` 2.4 编译源码此步骤至少需要半小时以上。
中途可能会下载第三方软件包,建议提前确认网络环境。
```bash mkdir build cd build/ cmake -D WITH_CUDA=ON -D WITH_CUDNN=ON -D CUDA_ARCH_BIN="8.7" -D CUDA_ARCH_PTX="" -D OPENCV_GENERATE_PKGCONFIG=ON -D OPENCV_EXTRA_MODULES_PATH=../../opencv_contrib-${version}/modules -D WITH_GSTREAMER=ON -D WITH_LIBV4L=ON -D BUILD_opencv_python3=ON -D BUILD_TESTS=OFF -D BUILD_PERF_TESTS=OFF -D BUILD_EXAMPLES=OFF -D CMAKE_BUILD_TYPE=RELEASE -D CMAKE_INSTALL_PREFIX=/usr/local .. make -j$(nproc) ``` 2.5 安装 ```bash sudo make install echo 'export LD_LIBRARY_PATH=/usr/local/lib:$LD_LIBRARY_PATH' >> ~/.bashrc echo 'export PYTHONPATH=/usr/local/lib/python3.10/site-packages/:$PYTHONPATH' >> ~/.bashrc source ~/.bashrc ``` #### 三、验证测试 [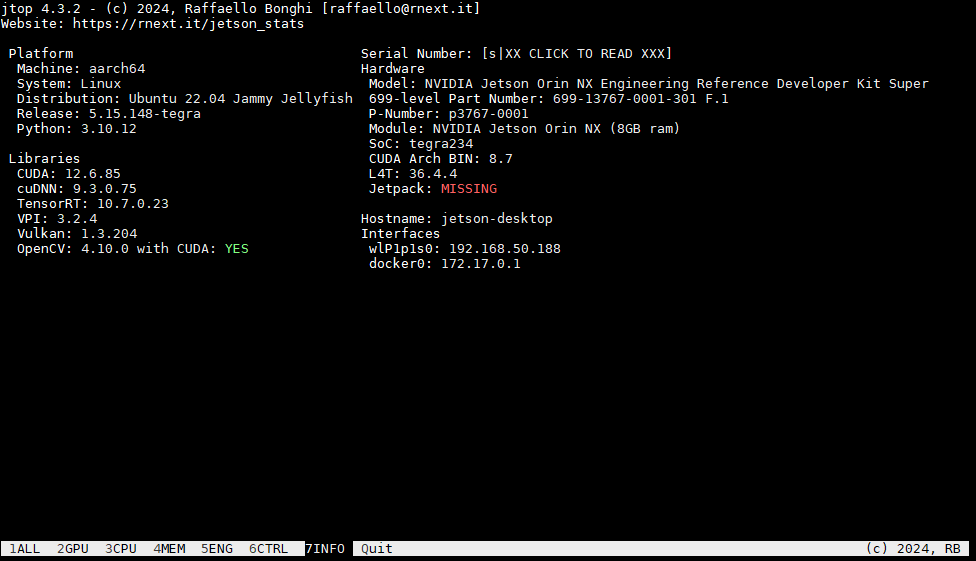](https://www.linkzeelabs.com/wiki/uploads/images/gallery/2025-07/bA0image.png) ```c++ #--test_cuda.cpp #include| PyTorch Version | NVIDIA Framework [Container](https://catalog.ngc.nvidia.com/orgs/nvidia/containers/pytorch) | NVIDIA Framework [Wheel](https://developer.download.nvidia.com/compute/redist/jp/) | JetPack Version |
|---|---|---|---|
| [2.8.0a0+5228986c39](https://github.com/pytorch/pytorch/commit/5228986c395dc79f90d2a2b991deea1eef188260) | 25.06 | - | 6.2 |
| [2.8.0a0+5228986c39](https://github.com/pytorch/pytorch/commit/5228986c395dc79f90d2a2b991deea1eef188260) | 25.05 | - | 6.2 |
| [2.7.0a0+79aa17489c](https://github.com/pytorch/pytorch/commit/79aa17489c3fc5ed6d5e972e9ffddf73e6dd0a5c) | 25.04 | - | 6.2 |
| [2.7.0a0+7c8ec84dab](https://github.com/pytorch/pytorch/commit/7c8ec84dab7dc10d4ef90afc93a49b97bbd04503) | 25.03 | - | 6.2 |
| [2.7.0a0+6c54963f75](https://github.com/pytorch/pytorch/commit/6c54963f75e9dfdae34c44f71081b5d3972b6b8d) | 25.02 | - | 6.2 |
| [2.6.0a0+ecf3bae40a](https://github.com/pytorch/pytorch/commit/ecf3bae40a6f2f0f3b237bde1fc4b2492765ab13) | 25.01 | - | 6.1 |
| [2.6.0a0+df5bbc09d1](https://github.com/pytorch/pytorch/commit/df5bbc09d191fff3bdb592c184176e84669a7157) | 24.12 | - | 6.1 |
| [2.6.0a0+df5bbc0](https://github.com/pytorch/pytorch/commit/df5bbc09d191fff3bdb592c184176e84669a7157) | 24.11 | - | 6.1 |
| [2.5.0a0+e000cf0ad9](https://github.com/pytorch/pytorch/commit/e000cf0ad980e5d140dc895a646174e9b945cf26) | 24.10 | - | 6.1 |
| [2.5.0a0+b465a5843b](https://github.com/pytorch/pytorch/commit/b465a5843b92f33fe3e89ff7ee91c6833df6aec0) | 24.09 | 24.09 | 6.1 |
| [2.5.0a0+872d972e41](https://github.com/pytorch/pytorch/commit/872d972e41596a9ac94dfd343f40bfc12b340a74) | 24.08 | - | 6.0 |
| [2.4.0a0+3bcc3cddb5](https://github.com/pytorch/pytorch/commit/3bcc3cddb580bf0f0f1958cfe27001f236eac2c1) | 24.07 | 24.07 | 6.0 |
| [2.4.0a0+f70bd71a48](https://github.com/pytorch/pytorch/commit/f70bd71a48) | 24.06 | 24.06 | 6.0 |
| [2.4.0a0+07cecf4168](https://github.com/pytorch/pytorch/commit/07cecf4168503a5b3defef9b2ecaeb3e075f4761) | 24.05 | 24.05 | 6.0 |
| [2.3.0a0+6ddf5cf85e](https://github.com/pytorch/pytorch/commit/6ddf5cf85e3c27c596175aba7bf5affb5426255f) | 24.04 | 24.04 | 6.0 Developer Preview |
| [2.3.0a0+40ec155e58](https://github.com/pytorch/pytorch/commit/40ec155e58ee1a1921377ff921b55e61502e4fb3) | 24.03 | [24.03](https://developer.download.nvidia.com/compute/redist/jp/v60dp/pytorch/torch-2.3.0a0+40ec155e58.nv24.03.13384722-cp310-cp310-linux_aarch64.whl) | |
| [2.3.0a0+ebedce2](https://github.com/pytorch/pytorch/commit/ebedce24ab578036dd9257e4928eea9ee38d1192) | 24.02 | 24.02 | |
| [2.2.0a0+81ea7a4](https://github.com/pytorch/pytorch/commit/81ea7a48) | 23.12, 24.01 | 23.12, 24.01 | |
| [2.2.0a0+6a974bec](https://github.com/pytorch/pytorch/commit/6a974bec) | 23.11 | 23.11 | |
| [2.1.0a](https://github.com/pytorch/pytorch/commit/41361538a978eb03fa1e88bf5b8e4410db7a6927) | 23.06 | 5.1.x | |
| [2.0.0](https://github.com/pytorch/pytorch/tree/v2.0.0) | 23.05 | ||
| [2.0.0a0+fe05266f](https://github.com/pytorch/pytorch/commit/fe05266fda4f908130dea7cbac37e9264c0429a2) | 23.04 | ||
| [2.0.0a0+8aa34602](https://github.com/pytorch/pytorch/commit/8aa34602f703896c16ae57f622ff4cb1c86c04dd) | 23.03 | ||
| [1.14.0a0+44dac51c](https://github.com/pytorch/pytorch/commit/44dac51c36d01f63e64585e5e7a864cb8e37948a) | 23.02, 23.01 | ||
| [1.13.0a0+936e930](https://github.com/pytorch/pytorch/commit/936e930) | 22.11 | 5.0.2 | |
| [1.13.0a0+d0d6b1f](https://github.com/pytorch/pytorch/commit/d0d6b1f) | 22.09, 22,10 | ||
| [1.13.0a0+08820cb](https://github.com/pytorch/pytorch/commit/08820cb) | 22.07 | 22.07 | |
| [1.13.0a0+340c412](https://github.com/pytorch/pytorch/commit/340c412) | 22.06 | 22.06 | 5.0.1 |
| [1.12.0a0+8a1a93a9](https://github.com/pytorch/pytorch/commit/8a1a93a9) | 22.05 | 22.05 | 5.0 |
| [1.12.0a0+bd13bc66](https://github.com/pytorch/pytorch/commit/bd13bc66) | 22.04 | ||
| [1.12.0a0+2c916ef](https://github.com/pytorch/pytorch/commit/2c916ef) | 22.03 | ||
| [1.11.0a0+bfe5ad28](https://github.com/pytorch/pytorch/commit/bfe5ad28) | 22.01 | 4.6.1 |
开始本节内容前请确定您的网络环境能正常拉取docker镜像
Jetson-container是NVIDIA为Jetson设备打造的轻量Docker环境,预装CUDA、cuDNN、TensorRT,快速部署AI边缘应用。 本节以 **Jetson Orin NX 16GB**,**JetPack6.2.1** 运行 **Comfy-UI** 为例进行展示。您也可以参考[官方示例](https://github.com/dusty-nv/jetson-containers/tree/master/packages/diffusion/comfyui) **Comfy-UI** 是一款专业的节点式Stable Diffusion图形界面,拖拽连接即可构建文生图工作流,支持LoRA、ControlNet、视频扩散,低代码、易扩展等应用及特性。 [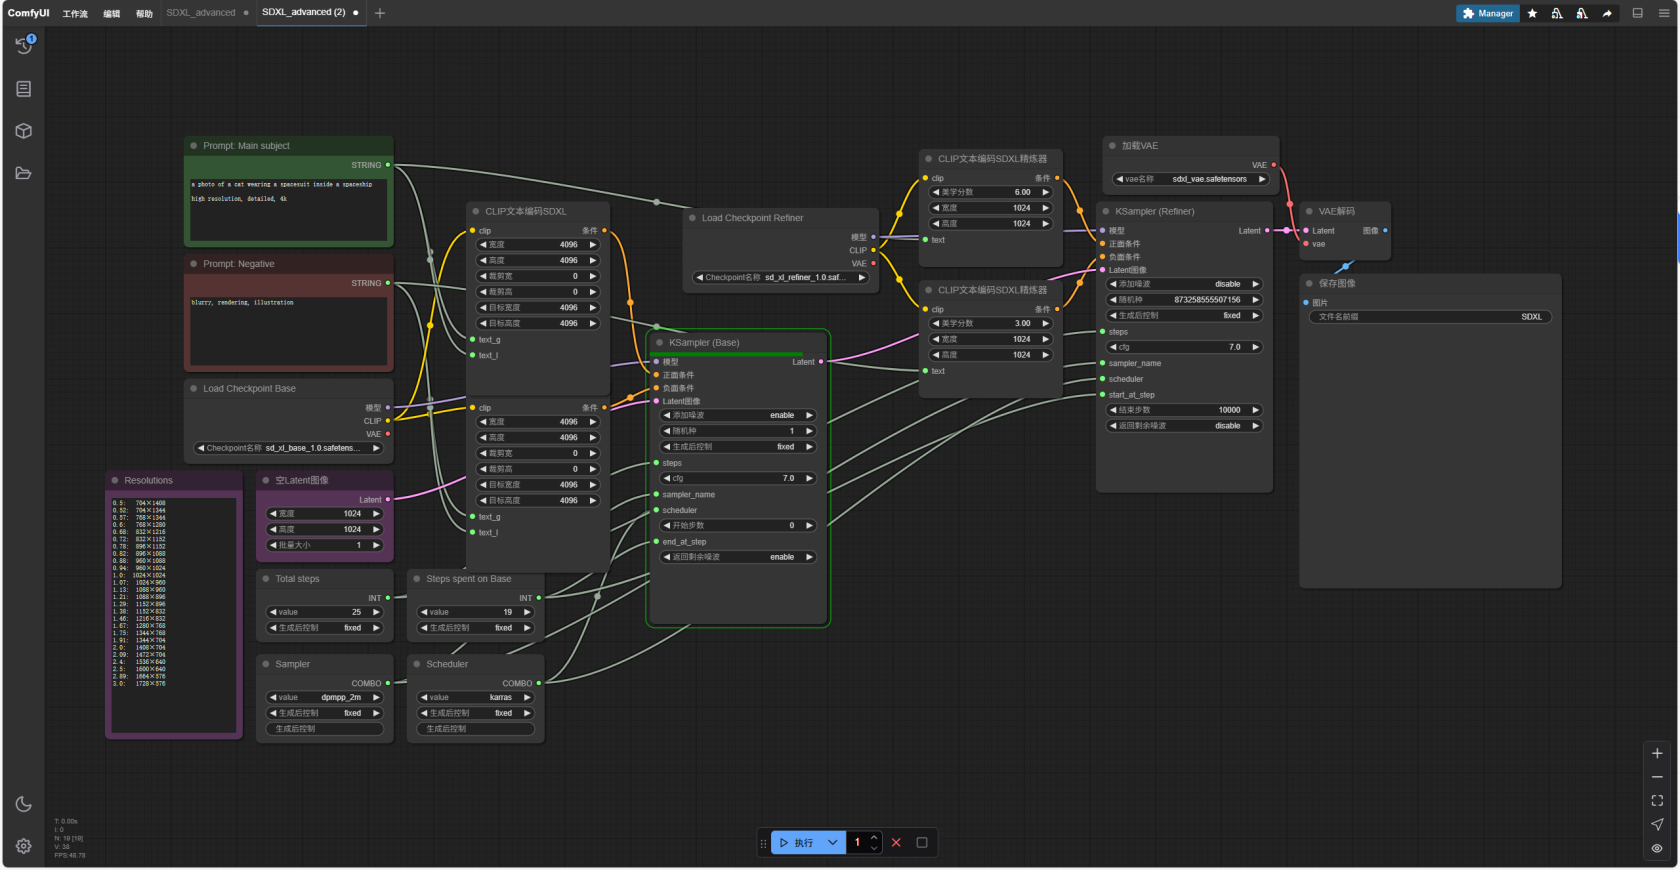](https://www.linkzeelabs.com/wiki/uploads/images/gallery/2025-08/1uQimage.png) 1\. 下载编译[jetson-container](https://github.com/dusty-nv/jetson-containers/tree/master)环境 ``` git clone https://github.com/dusty-nv/jetson-containers.git cd jetson-containersbash jetson-containers/install.sh ``` 2\. 拉取docker镜像并运行 ``` jetson-containers run dustynv/comfyui:r36.4.3 ``` 3\. 成功运行后命令行窗口输出如下 [](https://www.linkzeelabs.com/wiki/uploads/images/gallery/2025-08/wDnimage.png) 4\. 打开对应服务的GUI网页 若在Jetson设备上打开则访问 [http://0.0.0.0:8188](http://0.0.0.0:8188) 若在局域网内的其他设备则输入 http://<jetson设备IP>:8188 [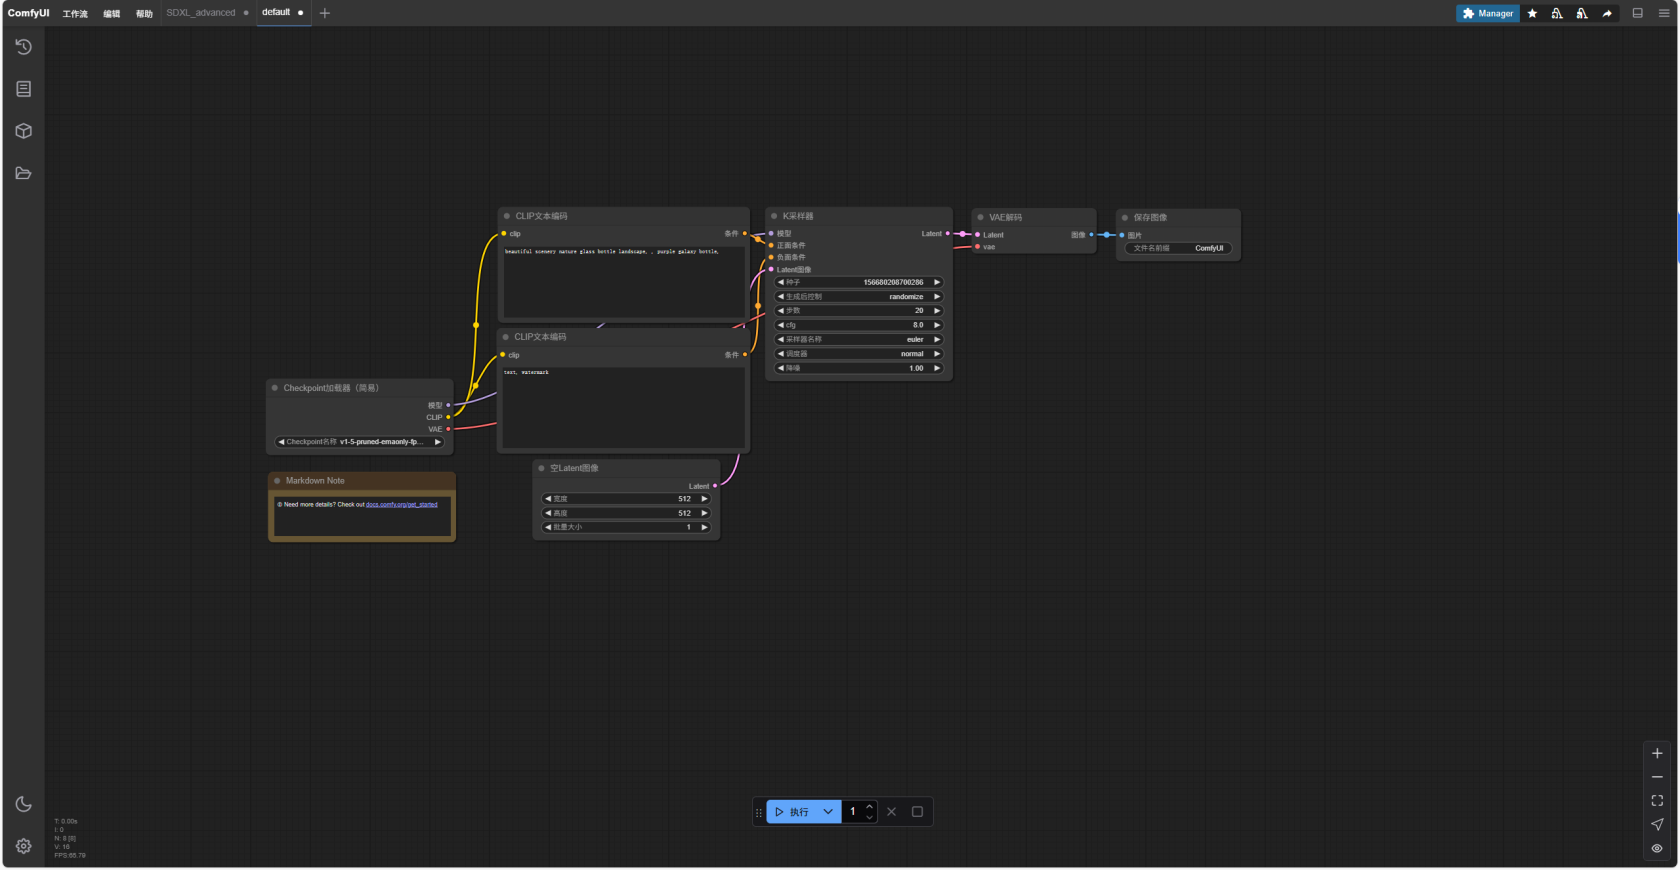](https://www.linkzeelabs.com/wiki/uploads/images/gallery/2025-08/52qimage.png) 5\. 设定映射路径,将开发板里下载好的模型映射到容器内部目录 ```bash jetson-containers run ~/models/:/opt/ComfyUI/models/checkpoints dustynv/comfyui:r36.4.3 ``` 6\. 按照需求搭建工作流并调整参数生成图像 [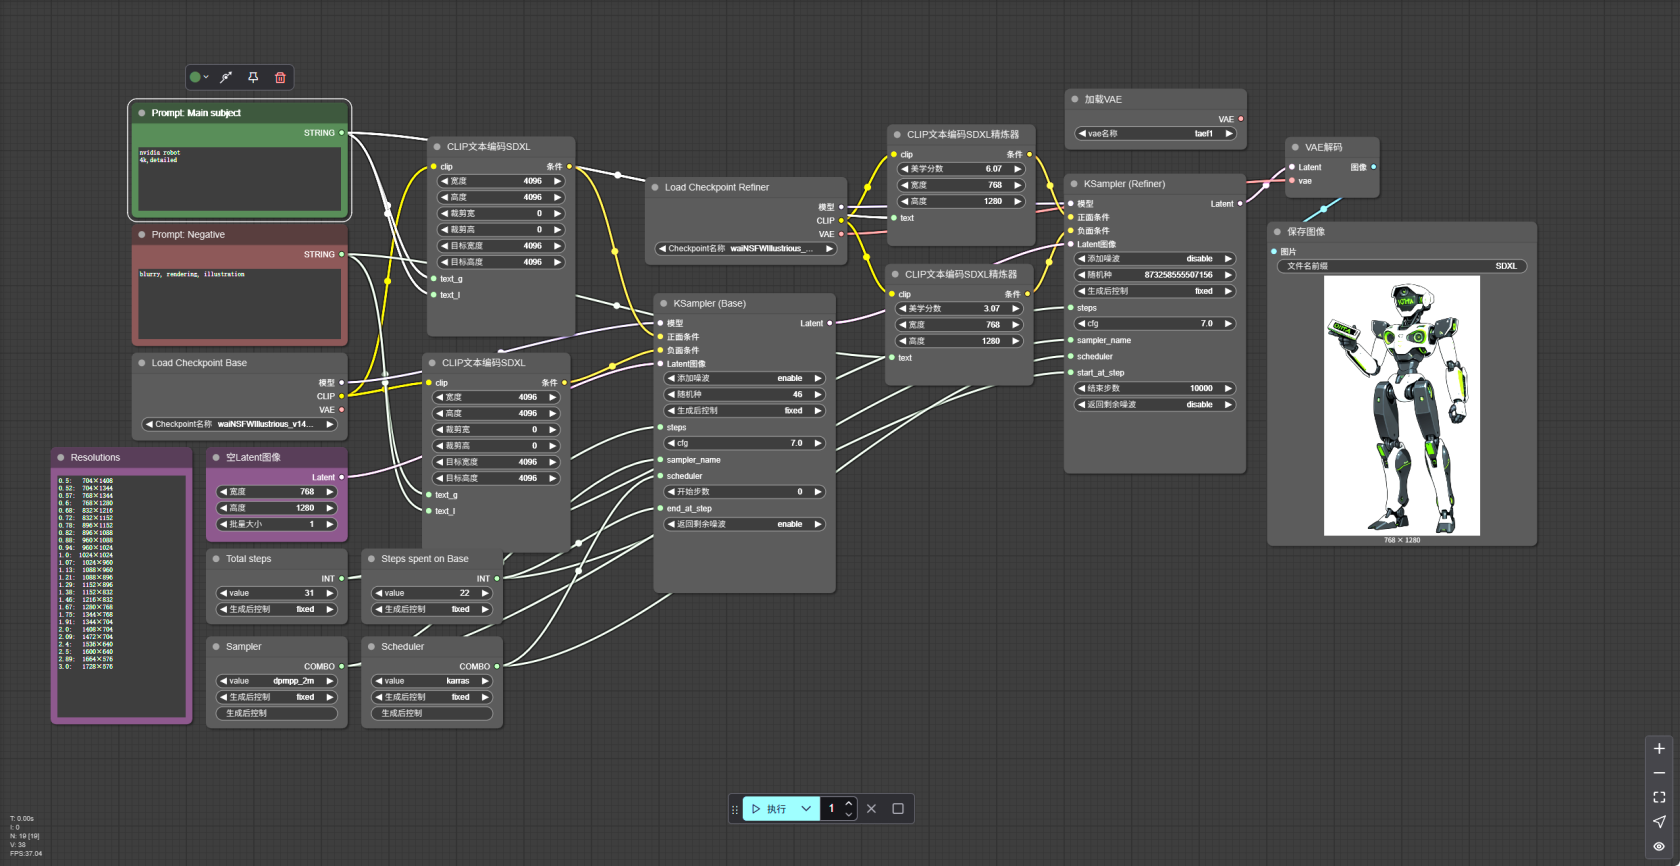](https://www.linkzeelabs.com/wiki/uploads/images/gallery/2025-08/1Naimage.png) 关于ComfyUI的使用教程请参考其官网 [ComfyUI | 用AI生成视频、图像、音频](https://www.comfy.org/zh-cn/) # 使用TensorRT加速 c++ python绑定 # 网卡驱动 # 4G模块使用说明 移远通信LTE Standard EM05系列是一款专为IoT/M2M应用而设计的LTE Cat 4模块。采用节省空间的M.2(NGFF)封装类型,超薄、紧凑的设计使其更易于嵌入到小尺寸产品中。 EM05系列支持最大下行速率150 Mbps,最大上行速率50 Mbps,包含三个型号:EM05-CN、EM05-E和EM05-G。支持LTE-FDD、LTE-TDD、DC-HSDPA、HSPA+、HSDPA、HSUPA、WCDMA和CDMA等多种网络制式。 要在Jetson系列上使用EM-05模块需要重新编译系统内核并刷入新编译的系统。 #### 方法一:替换新内核 ##### 1.1 拉取编译好的资料 ##### 1.2 修改设备树配置文件 ##### 1.3 移动内核和驱动到指定位置 ##### 1.4 应用更改并重启验证 #### 方法二:编译刷入完整系统 ##### 2.1 获取源码和工具链 - 安装编译依赖工具 ```bash sudo apt install build-essential bc sudo apt-get install git bison flex libssl-dev zip libncurses-dev make git sudo apt-get install build-essential bc ``` - 创建工具链放置目录 ``` mkdir $HOME/l4t-gcc-toolchain cd $HOME/l4t-gcc-toolchain ``` - 下载并解压交叉编译工具链 ``` wget https://developer.nvidia.com/downloads/embedded/l4t/r36_release_v3.0/toolchain/aarch64--glibc--stable-2022.08-1.tar.bz2 tar xf aarch64--glibc--stable-2022.08-1.tar.bz2 ``` - 进入到缓存好的刷机固件目录 ```bash cd $HOME/nvidia/nvidia_sdk/JetPack_6.2.1_Linux_JETSON_ORIN_NANO_TARGETS/Linux_for_Tegra/source #根据实际目录进行修改 ``` - 根据 release tag 拉取源码。[Jetson Linux Archive | NVIDIA Developer](https://developer.nvidia.com/embedded/jetson-linux-archive) ```bash ./source_sync.sh -k -t本部分内容可参考[移远Linux&Andriod驱动技术手册](https://forums.quectel.com/uploads/short-url/95mRmCPDAFQTH1TzCIB2cuFr9Yo.pdf "移远Linux&Andriod驱动技术手册")
Jetson Orin Nano配置文件路径:arch/arm64/configs/defconfig - 配置USB转串口驱动添加如下内容 ```bash CONFIG_USB_SERIAL=y CONFIG_USB_SERIAL_WWAN=y CONFIG_USB_SERIAL_OPTION=y CONFIG_USB_NET_DRIVERS=y CONFIG_USB_USBNET=y CONFIG_USB_NET_QMI_WWAN=y CONFIG_USB_WDM=y ``` - 修改 drivers/usb/serial/option.c,向USB转串口驱动添加VID和PID ```c static const struct usb_device_id option_ids[] = { #if 1 // 2025-04-24 Added by Quectel { USB_DEVICE(0x2C7C, 0x0125) }, #endif ... ... } ``` - 使用USBNet驱动,文件路径:drivers/usb/serial/option.c ```c static int option_probe(struct usb_serial *serial, const struct usb_device_id *id) { ... ... #if 1 // 2025-04-24 Added by Quectel if (serial->dev->descriptor.idVendor == cpu_to_le16(0x2C7C)) { __u16 idProduct = le16_to_cpu(serial->dev->descriptor.idProduct); struct usb_interface_descriptor *intf = &serial->interface->cur_altsetting->desc; if (intf->bInterfaceClass != 0xFF || intf->bInterfaceSubClass == 0x42) { //ECM, RNDIS, NCM, MBIM, ACM, UAC, ADB return -ENODEV; } if ((idProduct&0xF000) == 0x0000) { //MDM interface 4 is QMI if (intf->bInterfaceNumber == 4 && intf->bNumEndpoints == 3 && intf->bInterfaceSubClass == 0xFF && intf->bInterfaceProtocol == 0xFF) return -ENODEV; } } #endif /* Store the device flags so we can use them during attach. */ usb_set_serial_data(serial, (void *)device_flags); return 0; } ``` - 添加零包机制,文件路径:drivers/usb/serial/usb\_wwan.c ```c static struct urb *usb_wwan_setup_urb(struct usb_serial_port *port, int endpoint, int dir, void *ctx, char *buf, int len, void (*callback) (struct urb *)) { ... ... usb_fill_bulk_urb(urb, serial->dev, usb_sndbulkpipe(serial->dev, endpoint) | dir, buf, len, callback, ctx); #if 1 //2025-04-24 Added by Quectel for zero packet if (dir == USB_DIR_OUT) { struct usb_device_descriptor *desc = &serial->dev->descriptor; if (desc->idVendor == cpu_to_le16(0x2C7C)) urb->transfer_flags |= URB_ZERO_PACKET; } #endif return urb; } ``` - 添加Reset-resume机制(休眠唤醒)文件路径:drivers/usb/serial/option.c ```c static struct usb_serial_driver option_1port_device = { ... ... #ifdef CONFIG_PM .suspend = usb_wwan_suspend, .resume = usb_wwan_resume, #if 1 //2025-04-24 Added by Quectel .reset_resume = usb_wwan_resume, #endif #endif }; ``` - 添加QMI\_WWAN驱动 移远提供了QMI\_WWAN驱动源文件qmi\_wwan\_q.c,将其复制到 drivers/net/usb/ 目录下。同时修改drivers/net/usb/Makefile,使其能编译 qmi\_wwan\_q.c ```bash #Makefile # must insert qmi_wwan_q.o before qmi_wwan.o obj-${CONFIG_USB_NET_QMI_WWAN} += qmi_wwan_q.o obj-${CONFIG_USB_NET_QMI_WWAN} += qmi_wwan.o ``` ##### 2.3 编译内核此步骤可能需要进行半个小时以上
- 创建输出目录 ```bash cd ../../ mkdir kernel_out ``` - 编译安装内核 ```bash export CROSS_COMPILE=$HOME/l4t-gcc-toolchain/aarch64--glibc--stable-2022.08-1/bin/aarch64-buildroot-linux-gnu- #设置交叉编译工具 make -C kernel #构建 Jetson Linux 内核镜像 sudo -E make install -C kernel #安装内核模块和树内模块 ``` - 将内核镜像复制到刷机目录下 ``` cp kernel/kernel-jammy-src/arch/arm64/boot/Image ../Linux_for_Tegra/kernel/Image ``` - 构建NVIDIA树外模块(驱动程序) ```bash export CROSS_COMPILE=$HOME/l4t-gcc-toolchain/aarch64--glibc--stable-2022.08-1/bin/aarch64-buildroot-linux-gnu- export KERNEL_HEADERS=$PWD/kernel/kernel-jammy-src make modules ``` - 安装到刷机目录下 ```bash export INSTALL_MOD_PATH=$HOME/nvidia/nvidia_sdk/JetPack_6.2.1_Linux_JETSON_ORIN_NANO_TARGETS/Linux_for_Tegra/rootfs/ #根据实际目录进行修改 sudo -E make modules_install ``` - 开始构建DTB ```bash export CROSS_COMPILE=$HOME/l4t-gcc-toolchain/aarch64--glibc--stable-2022.08-1/bin/aarch64-buildroot-linux-gnu- export KERNEL_HEADERS=$PWD/kernel/kernel-jammy-src make dtbs ``` - 将生成的dtb文件拷贝到刷机目录 ```bash cp kernel-devicetree/generic-dts/dtbs/* /Linux_for_Tegra/kernel/dtb/ ``` ##### 2.4 刷入系统 - 进入刷机固件缓存目录 ```bash cd $HOME/nvidia/nvidia_sdk/JetPack_6.2.1_Linux_JETSON_ORIN_NANO_TARGETS/Linux_for_Tegra/source #根据实际目录进行修改 ``` 使用命令行刷机: - super模式 ```bash sudo ./tools/kernel_flash/l4t_initrd_flash.sh --external-device nvme0n1p1 -c tools/kernel_flash/flash_l4t_t234_nvme.xml -p "-c bootloader/generic/cfg/flash_t234_qspi.xml" --showlogs --network usb0 jetson-orin-nano-devkit-super internal ``` - 普通模式 ``` sudo ./flash.sh jetson-orin-nano-devkit-nvme internal ``` ##### 2.5 开机验证 - 将Quectel\_Qconnectmanager上传到开发板 - 解压并编译 ```bash unizp Quectel_QConnectManager_Linux_V1.6.5.zip cd Quectel_QConnectManager_Linux_V1.6.5 make ``` 成功运行便可4G拨号上网 ``` jetson@jetson-desktop:~/Downloads/Quectel_QConnectManager_Linux_V1.6.5$ sudo ./quectel-CM [08-08_11:39:04:415] QConnectManager_Linux_V1.6.5 [08-08_11:39:04:416] Find /sys/bus/usb/devices/1-2.2 idVendor=0x2c7c idProduct=0x125, bus=0x001, dev=0x007 [08-08_11:39:04:416] Auto find qmichannel = /dev/cdc-wdm0 [08-08_11:39:04:417] Auto find usbnet_adapter = wwan0 [08-08_11:39:04:417] netcard driver = qmi_wwan_q, driver version = V1.2.6 [08-08_11:39:04:417] Modem works in QMI mode [08-08_11:39:04:447] cdc_wdm_fd = 7 [08-08_11:39:04:523] Get clientWDS = 5 [08-08_11:39:04:557] Get clientDMS = 1 [08-08_11:39:04:589] Get clientNAS = 2 [08-08_11:39:04:620] Get clientUIM = 1 [08-08_11:39:04:653] Get clientWDA = 1 [08-08_11:39:04:684] requestBaseBandVersion EM05CNFDR08A03M1G_ND [08-08_11:39:04:812] requestGetSIMStatus SIMStatus: SIM_READY [08-08_11:39:04:876] requestGetProfile[pdp:1 index:1] ctnet///0/IPV4V6 [08-08_11:39:04:908] requestRegistrationState2 MCC: 460, MNC: 11, PS: Attached, DataCap: LTE [08-08_11:39:04:940] requestQueryDataCall IPv4ConnectionStatus: DISCONNECTED [08-08_11:39:04:941] ip addr flush dev wwan0 [08-08_11:39:04:947] ip link set dev wwan0 down [08-08_11:39:05:003] requestSetupDataCall WdsConnectionIPv4Handle: 0x8723e530 [08-08_11:39:05:132] ip link set dev wwan0 up [08-08_11:39:05:141] No default.script found, it should be in '/usr/share/udhcpc/' or '/etc//udhcpc' depend on your udhcpc version! [08-08_11:39:05:142] busybox udhcpc -f -n -q -t 5 -i wwan0 udhcpc: started, v1.30.1 udhcpc: sending discover udhcpc: sending select for 10.21.181.66 udhcpc: lease of 10.21.181.66 obtained, lease time 7200 [08-08_11:39:05:282] ip -4 address flush dev wwan0 [08-08_11:39:05:286] ip -4 address add 10.21.181.66/30 dev wwan0 [08-08_11:39:05:292] ip -4 route add default via 10.21.181.65 dev wwan0 ``` 查看网卡信息 ```bash jetson@jetson-desktop:~$ ifconfig wwan0 wwan0: flags=193