JETSON ORIN 系列AI视觉教程
本章主要Jetson特色的视觉功能使用
编译安装opencv with cuda
JetPack预装的opencv没有启用cuda,需要自行编译安装。
1. 脚本一键安装
#!/bin/bash
# opencv_install.sh
# Modified from https://github.com/AastaNV/JEP/blob/master/script/install_opencv4.10.0_Jetpack6.1.sh

version="4.10.0"
folder="workspace"
remove_old=""

set -e

# Parse command-line arguments
for arg in "$@"; do
    case $arg in
        --version=*)
            version="${arg#*=}"
            ;;
        --folder=*)
            folder="${arg#*=}"
            ;;
        --remove-old=*)
            remove_old="${arg#*=}"
            ;;
        --help|-h)
            echo "Usage: $0 [--version=4.x.x] [--folder=dir] [--remove-old=yes/no]"
            exit 0
            ;;
        *)
            echo "Unknown parameter: $arg"
            echo "Usage: $0 [--version=4.x.x] [--folder=dir] [--remove-old=yes/no]"
            exit 1
            ;;
    esac
done

# Create installation directory if it doesn't exist
if [ ! -d "$folder" ]; then
    echo "Creating directory: $folder"
    mkdir -p "$folder"
fi
cd "$folder" || exit

# Old OpenCV removal logic
if [ -z "$remove_old" ]; then
    read -rp "Do you want to remove system-installed OpenCV? (yes/no): " remove_old
fi

case "$remove_old" in
    [yY] | [yY][eE][sS])
        echo "** Removing system OpenCV packages"
        sudo apt -y purge *libopencv*
        sudo apt -y autoremove
        ;;
    *)
        echo "** Skipping system OpenCV removal"
        ;;
esac

echo "------------------------------------"
echo "** Installing dependencies (1/4)"
echo "------------------------------------"
sudo apt-get update
sudo apt-get install -y build-essential cmake git libgtk2.0-dev pkg-config \
    libavcodec-dev libavformat-dev libswscale-dev libgstreamer1.0-dev \
    libgstreamer-plugins-base1.0-dev python3-dev python3-numpy libtbb2 \
    libtbb-dev libjpeg-dev libpng-dev libtiff-dev libv4l-dev v4l-utils qv4l2 curl

# Verify essential dependencies installed
for dep in g++ cmake git pkg-config; do
    if ! command -v "$dep" > /dev/null; then
        echo "Error: $dep installation failed"
        exit 1
    fi
done

echo "------------------------------------"
echo "** Downloading OpenCV ${version} (2/4)"
echo "------------------------------------"

# Check if source files already exist
download_opencv=false
download_contrib=false

if [ ! -f "opencv-${version}.zip" ]; then
    echo "Downloading opencv-${version}.zip"
    wget -O opencv-${version}.zip https://github.com/opencv/opencv/archive/${version}.zip || {
        echo "Download failed! Check your internet connection or verify the version exists"
        exit 1
    }
    download_opencv=true
else
    echo "opencv-${version}.zip exists, skipping download"
fi

if [ ! -f "opencv_contrib-${version}.zip" ]; then
    echo "Downloading opencv_contrib-${version}.zip"
    wget -O opencv_contrib-${version}.zip https://github.com/opencv/opencv_contrib/archive/${version}.zip || {
        echo "Download failed! Check your internet connection or verify the version exists"
        exit 1
    }
    download_contrib=true
else
    echo "opencv_contrib-${version}.zip exists, skipping download"
fi

# Unpack source files
if [ ! -d "opencv-${version}" ] || $download_opencv; then
    if [ -d "opencv-${version}" ]; then
        echo "Removing existing opencv-${version} directory"
        rm -rf "opencv-${version}"
    fi
    echo "Unpacking opencv-${version}.zip"
    unzip -q opencv-${version}.zip || {
        echo "Extraction failed! File may be corrupt"
        exit 1
    }
fi

if [ ! -d "opencv_contrib-${version}" ] || $download_contrib; then
    if [ -d "opencv_contrib-${version}" ]; then
        echo "Removing existing opencv_contrib-${version} directory"
        rm -rf "opencv_contrib-${version}"
    fi
    echo "Unpacking opencv_contrib-${version}.zip"
    unzip -q opencv_contrib-${version}.zip || {
        echo "Extraction failed! File may be corrupt"
        exit 1
    }
fi

# Clean up zip files after successful extraction
if [ $? -eq 0 ]; then
    rm -f opencv-${version}.zip opencv_contrib-${version}.zip
fi

cd opencv-${version} || exit

echo "------------------------------------"
echo "** Building OpenCV ${version} (3/4)"
echo "------------------------------------"
mkdir -p release
cd release

# Auto-detect CUDA architecture
cuda_arch=""
if command -v nvidia-smi &> /dev/null; then
    gpu_name=$(nvidia-smi --query-gpu=name --format=csv,noheader | head -n1)
    if [[ $gpu_name == *"Orin"* ]] || [[ $gpu_name == *"Jetson"* ]]; then
        cuda_arch="8.7"
    elif [[ $gpu_name == *"A100"* ]]; then
        cuda_arch="8.0"
    fi
fi

cmake_cmd="cmake -D WITH_CUDA=ON -D WITH_CUDNN=ON -D OPENCV_GENERATE_PKGCONFIG=ON "
cmake_cmd+="-D OPENCV_EXTRA_MODULES_PATH=../../opencv_contrib-${version}/modules "
cmake_cmd+="-D WITH_GSTREAMER=ON -D WITH_LIBV4L=ON -D BUILD_opencv_python3=ON "
cmake_cmd+="-D BUILD_TESTS=OFF -D BUILD_PERF_TESTS=OFF -D BUILD_EXAMPLES=OFF "
cmake_cmd+="-D CMAKE_BUILD_TYPE=RELEASE -D CMAKE_INSTALL_PREFIX=/usr/local "

# Add CUDA architecture if detected
if [ -n "$cuda_arch" ]; then
    echo "Detected NVIDIA GPU: ${gpu_name}, using CUDA_ARCH_BIN=${cuda_arch}"
    cmake_cmd+="-D CUDA_ARCH_BIN=${cuda_arch} -D CUDA_ARCH_PTX=\"\" "
else
    echo "No supported GPU detected, skipping CUDA architecture flags"
fi

# Execute CMake configuration
echo "CMake command: $cmake_cmd .."
$cmake_cmd .. || {
    echo "CMake configuration failed"
    exit 1
}

# Parallel build (leave one core for system stability)
cpu_cores=$(($(nproc) - 1))
[ $cpu_cores -lt 1 ] && cpu_cores=1
echo "Building with ${cpu_cores} CPU cores"
make -j${cpu_cores} || {
    echo "Compilation failed"
    exit 1
}

echo "------------------------------------"
echo "** Installing OpenCV ${version} (4/4)"
echo "------------------------------------"
sudo make install || {
    echo "Installation failed"
    exit 1
}

# Add environment variables to .bashrc (only if not already present)
bashrc=~/.bashrc
env_lines=(
    "export LD_LIBRARY_PATH=/usr/local/lib:\$LD_LIBRARY_PATH"
    "export PYTHONPATH=/usr/local/lib/python3.10/site-packages/:\$PYTHONPATH"
)

for line in "${env_lines[@]}"; do
    if ! grep -Fxq "$line" "$bashrc"; then
        echo "Adding to .bashrc: $line"
        echo "$line" >> "$bashrc"
    else
        echo "Environment variable already exists: $line"
    fi
done

source ~/.bashrc

echo "** OpenCV ${version} installation completed"
echo "Verification commands:"
echo "  pkg-config --modversion opencv4"
echo "  python3 -c 'import cv2; print(cv2.__version__)'"

echo "** Installation successful!"
2. 手动安装
2.1 卸载自带opencv
sudo apt-get purge libopencv*
sudo apt autoremove
sudo apt-get update
2.2 安装前置软件包
sudo apt-get update
sudo apt-get install -y build-essential cmake git libgtk2.0-dev pkg-config libavcodec-dev libavformat-dev libswscale-dev
sudo apt-get install -y libgstreamer1.0-dev libgstreamer-plugins-base1.0-dev python3.10-dev python3-numpy
sudo apt-get install -y libtbb2 libtbb-dev libjpeg-dev libpng-dev libtiff-dev libv4l-dev v4l-utils qv4l2
sudo apt-get install -y curl
2.3 获取opencv源码(以4.10.0版本为例)
version=4.10.0
wget -O "opencv-${version}.zip" "https://github.com/opencv/opencv/archive/${version}.zip"
wget -O "opencv_contrib-${version}.zip" "https://github.com/opencv/opencv_contrib/archive/${version}.zip"
unzip "opencv-${version}.zip"
unzip "opencv_contrib-${version}.zip"
rm "opencv-${version}.zip" "opencv_contrib-${version}.zip"
cd "opencv-${version}/"
2.4 编译源码
此步骤至少需要半小时以上。
中途可能会下载第三方软件包,建议提前确认网络环境。
mkdir build
cd build/
cmake -D WITH_CUDA=ON -D WITH_CUDNN=ON -D CUDA_ARCH_BIN="8.7" -D CUDA_ARCH_PTX="" -D OPENCV_GENERATE_PKGCONFIG=ON -D OPENCV_EXTRA_MODULES_PATH=../../opencv_contrib-${version}/modules -D WITH_GSTREAMER=ON -D WITH_LIBV4L=ON -D BUILD_opencv_python3=ON -D BUILD_TESTS=OFF -D BUILD_PERF_TESTS=OFF -D BUILD_EXAMPLES=OFF -D CMAKE_BUILD_TYPE=RELEASE -D CMAKE_INSTALL_PREFIX=/usr/local ..
make -j$(nproc)
2.5 安装
sudo make install
echo 'export LD_LIBRARY_PATH=/usr/local/lib:$LD_LIBRARY_PATH' >> ~/.bashrc
echo 'export PYTHONPATH=/usr/local/lib/python3.10/site-packages/:$PYTHONPATH' >> ~/.bashrc
source ~/.bashrc
三、验证测试
#--test_cuda.cpp

#include <opencv2/opencv.hpp>
#include <opencv2/core/cuda.hpp>
#include <opencv2/cudaarithm.hpp>
#include <iostream>
#include <chrono>

// CPU 矩阵乘法
void cpu_matrix_mult(cv::Mat& a, cv::Mat& b, cv::Mat& result) {
    for (int i = 0; i < 50; i++) {
        result = a * b;
    }
}

// GPU 矩阵乘法
void gpu_matrix_mult(cv::cuda::GpuMat& d_a, cv::cuda::GpuMat& d_b, cv::cuda::GpuMat& d_result) {
    cv::cuda::Stream stream;

    for (int i = 0; i < 50; i++) {
        cv::cuda::gemm(d_a, d_b, 1.0, cv::cuda::GpuMat(), 0, d_result, 0, stream);
        stream.waitForCompletion();
    }
}

int main() {
    try {
        std::cout << "--- OpenCV CUDA Matrix Multiplication Test ---\n";

        // 创建两个 1000x1000 的随机矩阵
        cv::Mat mat_a(1000, 1000, CV_32FC1);
        cv::Mat mat_b(1000, 1000, CV_32FC1);
        cv::randu(mat_a, 0.0f, 1.0f);
        cv::randu(mat_b, 0.0f, 1.0f);

        cv::Mat cpu_result;

        // CPU 测试
        auto start_cpu = std::chrono::high_resolution_clock::now();
        cpu_matrix_mult(mat_a, mat_b, cpu_result);
        auto end_cpu = std::chrono::high_resolution_clock::now();
        double cpu_time = std::chrono::duration_cast<std::chrono::milliseconds>(end_cpu - start_cpu).count();

        // GPU 测试
        cv::cuda::GpuMat d_mat_a, d_mat_b, d_result;
        d_mat_a.upload(mat_a);
        d_mat_b.upload(mat_b);

        auto start_gpu = std::chrono::high_resolution_clock::now();
        gpu_matrix_mult(d_mat_a, d_mat_b, d_result);
        auto end_gpu = std::chrono::high_resolution_clock::now();
        double gpu_time = std::chrono::duration_cast<std::chrono::milliseconds>(end_gpu - start_gpu).count();

        // 下载结果进行验证
        cv::Mat gpu_result;
        d_result.download(gpu_result);

        // 计算误差(一般为空)
        double diff = cv::norm(cpu_result, gpu_result, cv::NORM_L2);
        std::cout << "Result difference: " << diff << "\n";

        std::cout << "Performance Results:\n"
                  << " - CPU time: " << cpu_time << " ms\n"
                  << " - GPU time: " << gpu_time << " ms\n"
                  << " - Speedup: " << cpu_time / gpu_time << "x\n";

        std::cout << "\n✅ CUDA matrix multiplication test completed\n";
        return 0;

    } catch (const cv::Exception& e) {
        std::cerr << "OpenCV Error (" << e.err << "): " << e.what() << "\n";
        return -1;
    } catch (const std::exception& e) {
        std::cerr << "Standard Error: " << e.what() << "\n";
        return -2;
    }
}
编译运行
jetson@jetson-desktop:~/work$ g++ test_cuda.cpp -o test_cuda `pkg-config --cflags --libs opencv4`
jetson@jetson-desktop:~/work$ ./test_cuda
--- OpenCV CUDA Performance Test ---
Performance Results:
 - CPU time: 2451 ms
 - GPU time: 918 ms
 - Speedup: 2.66993x

✅ CUDA performance test completed
安装使用pytorch和torchvision
PyTorch 是 Python 中最流行、最易用的深度学习框架之一。它让开发者能够像操作普通 Python 代码一样,直观、灵活地设计和训练复杂的神经网络模型。其简洁的 API 设计和强大的 GPU 加速支持,使得从研究想法到实际部署的开发过程都极其高效便捷,广受开发者青睐。
NVIDIA 为 Jetson 系列设备专门适配了对应的软件包,其版本依赖关系如下:
1.安装torch工具包
1.1下载并安装torch , torchvison
wget https://pypi.jetson-ai-lab.io/jp6/cu126/+f/62a/1beee9f2f1470/torch-2.8.0-cp310-cp310-linux_aarch64.whl
wget https://pypi.jetson-ai-lab.io/jp6/cu126/+f/907/c4c1933789645/torchvision-0.23.0-cp310-cp310-linux_aarch64.whl
pip install torch-2.8.0-cp310-cp310-linux_aarch64.whl torchvision-0.23.0-cp310-cp310-linux_aarch64.whl -i https://pypi.tuna.tsinghua.edu.cn/simple
1.2 检测是否正确安装
使用python执行下面三个语句
jetson@jetson-desktop:~$ python
Python 3.10.16 (main, Dec 11 2024, 16:18:56) [GCC 11.2.0] on linux
Type "help", "copyright", "credits" or "license" for more information.
>>> import torch
>>> print(torch.__version__)
2.8.0
>>> print(torch.cuda.is_available())
True
2. 运行YOLO11
YOLO 是一种实时目标检测算法,它将目标检测视为单阶段回归问题,通过将图像划分为网格并直接预测边界框与类别概率,实现高速且高精度的检测。YOLO系列因开源易用、部署灵活,广泛应用于自动驾驶、安防监控、工业质检等领域。
2.1 安装miniconda
curl -L https://repo.anaconda.com/miniconda/Miniconda3-py310_25.3.1-1-Linux-aarch64.sh | bash
source ~/miniconda3/bin/activate
conda --version
2.2 conda换源
conda config --add channels https://mirrors.ustc.edu.cn/anaconda/pkgs/main/
conda config --add channels https://mirrors.ustc.edu.cn/anaconda/pkgs/free/
conda config --add channels https://mirrors.ustc.edu.cn/anaconda/cloud/conda-forge/
conda config --add channels https://mirrors.ustc.edu.cn/anaconda/cloud/msys2/
conda config --set show_channel_urls yes
2.3创建conda环境
conda create -n jetson-ai python=3.102.4 进入conda环境
conda activate jetson-ai2.5 安装torch和torchvison
wget https://pypi.jetson-ai-lab.io/jp6/cu126/+f/62a/1beee9f2f1470/torch-2.8.0-cp310-cp310-linux_aarch64.whl
wget https://pypi.jetson-ai-lab.io/jp6/cu126/+f/907/c4c1933789645/torchvision-0.23.0-cp310-cp310-linux_aarch64.whl
pip install torch-2.8.0-cp310-cp310-linux_aarch64.whl torchvision-0.23.0-cp310-cp310-linux_aarch64.whl -i https://pypi.tuna.tsinghua.edu.cn/simple
2.6 安装ultralytics
pip install ultralytics -i https://pypi.tuna.tsinghua.edu.cn/simple2.7 运行摄像头视频推理例程
接入摄像头,并在上面创建的环境中运行如下程序。
import cv2
import time
from ultralytics import YOLO
from ultralytics import YOLOWorld

# Load the YOLO model
model = YOLO("yolo11s.pt")

# Open the video file
video_path = 0
cap = cv2.VideoCapture(video_path)

# Loop through the video frames
while cap.isOpened():

    # Read a frame from the video
    success, frame = cap.read()
    start = time.time()
    if success:
        # Run YOLO inference on the frame
        results = model(frame)
        inf_time = time.time() - start
        # Visualize the results on the frame
        annotated_frame = results[0].plot()
        fps = 1.0 / inf_time if inf_time > 0 else 0
        # show FPS
        cv2.putText(annotated_frame, f"FPS: {fps:.2f}", (10, 30), cv2.FONT_HERSHEY_SIMPLEX, 1, (0,255,0), 2)
        cv2.imshow("YOLO Inference", annotated_frame)

        # Break the loop if 'q' is pressed
        if cv2.waitKey(1) & 0xFF == ord("q"):
            break
    else:
        # Break the loop if the end of the video is reached
        break

# Release the video capture object and close the display window
cap.release()
cv2.destroyAllWindows()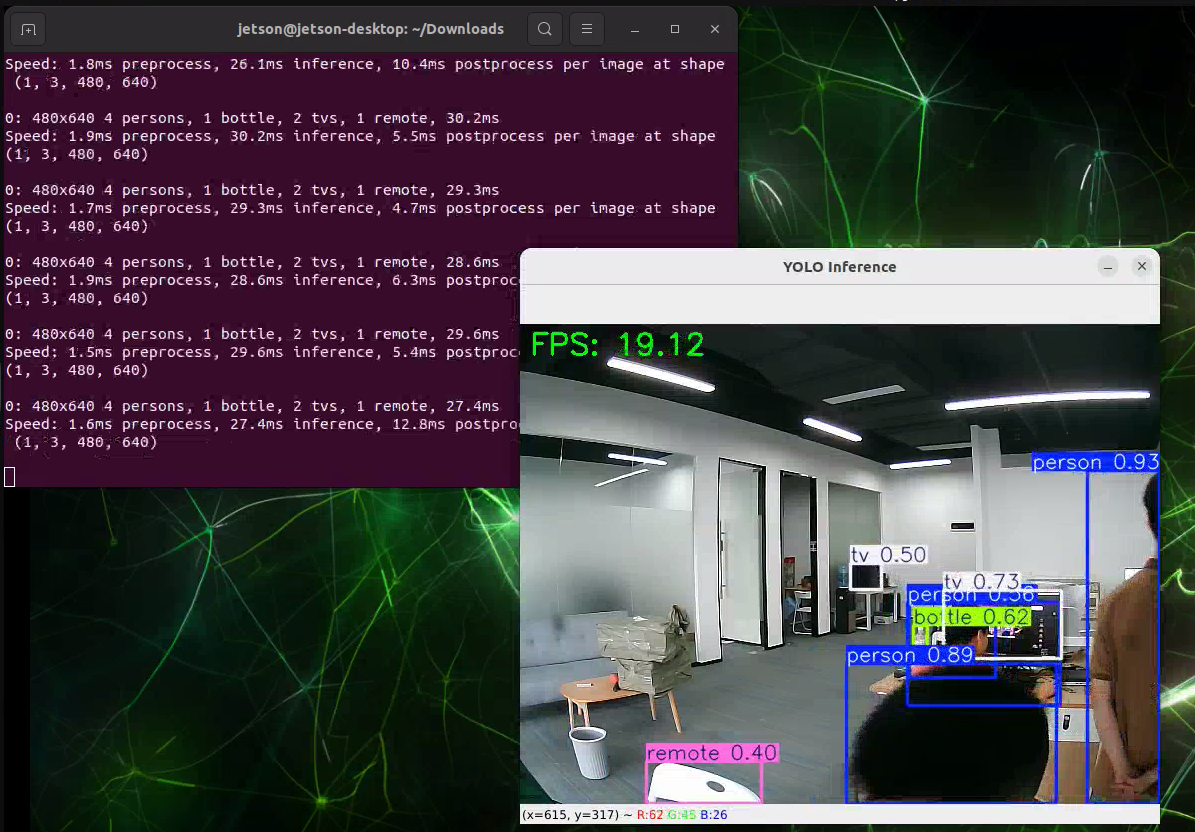
更多信息可参考Ultralytics YOLO11 -Ultralytics YOLO 文档
3. 手动编译安装Pytorch/torchvison
某些项目可能需要指定的pytorch版本,若官方没有提供编译完成的whl文件,也可以按照下面步骤进行手动编译。
通过Jetson-container使用Comfy-UI
开始本节内容前请确定您的网络环境能正常拉取docker镜像
Jetson-container是NVIDIA为Jetson设备打造的轻量Docker环境,预装CUDA、cuDNN、TensorRT,快速部署AI边缘应用。
本节以 Jetson Orin NX 16GB,JetPack6.2.1 运行 Comfy-UI 为例进行展示。您也可以参考官方示例
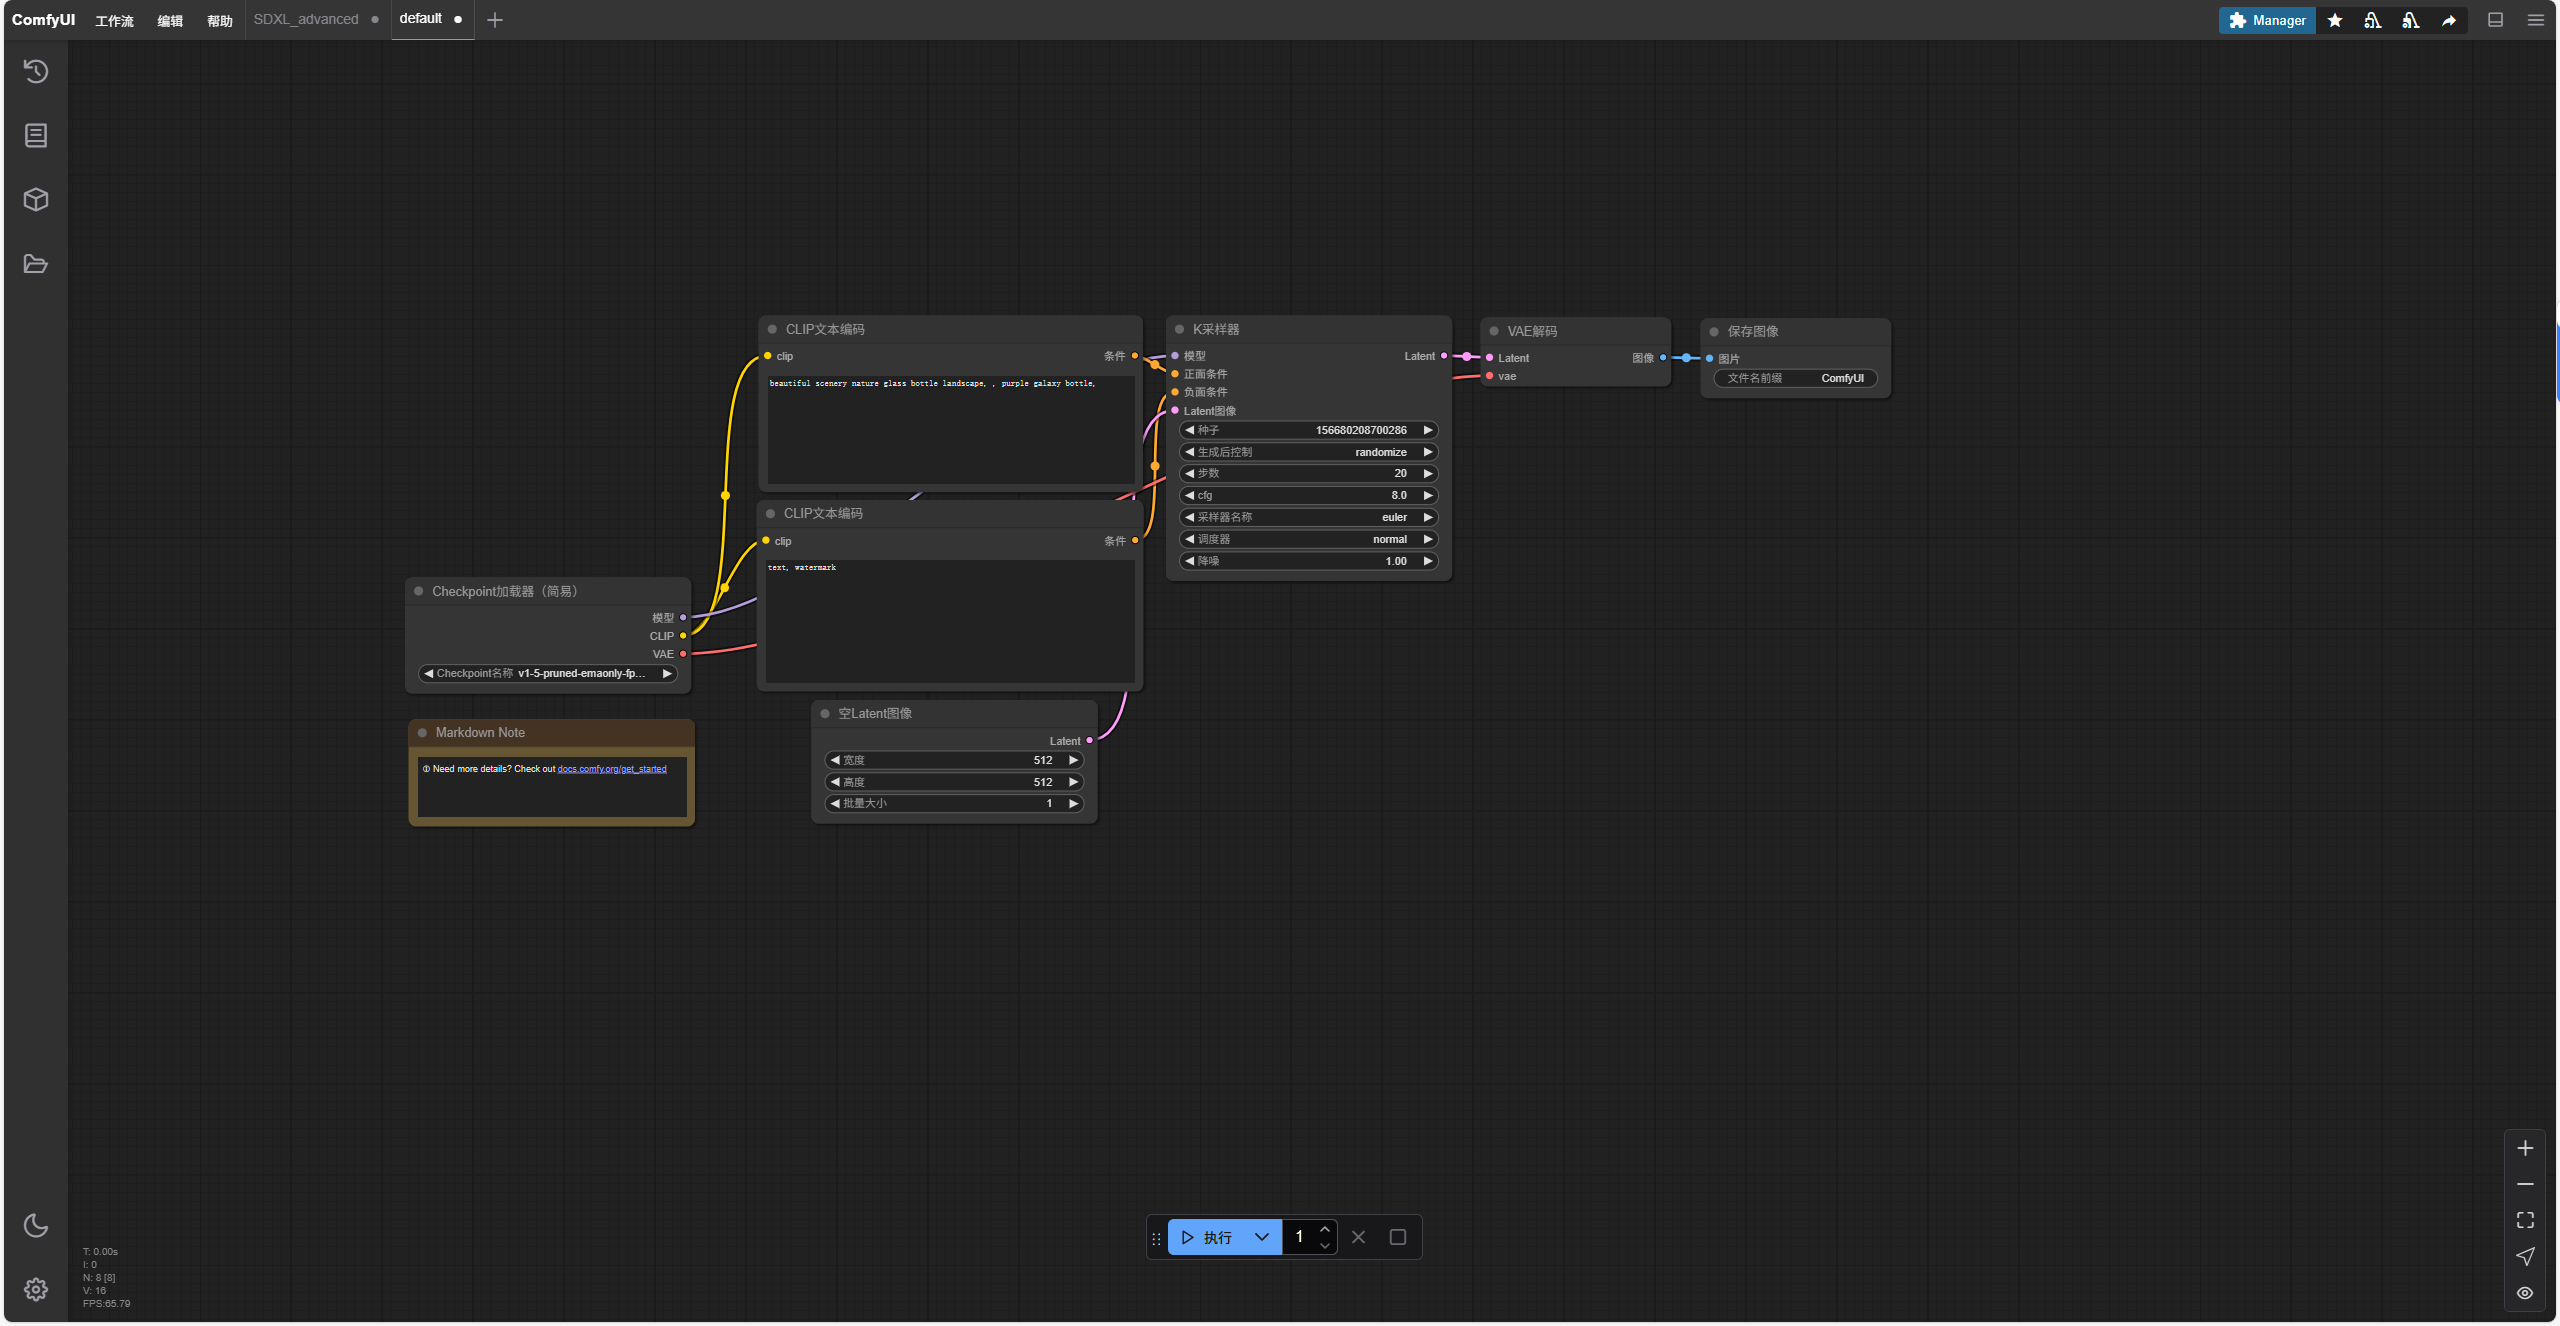
Comfy-UI 是一款专业的节点式Stable Diffusion图形界面,拖拽连接即可构建文生图工作流,支持LoRA、ControlNet、视频扩散,低代码、易扩展等应用及特性。
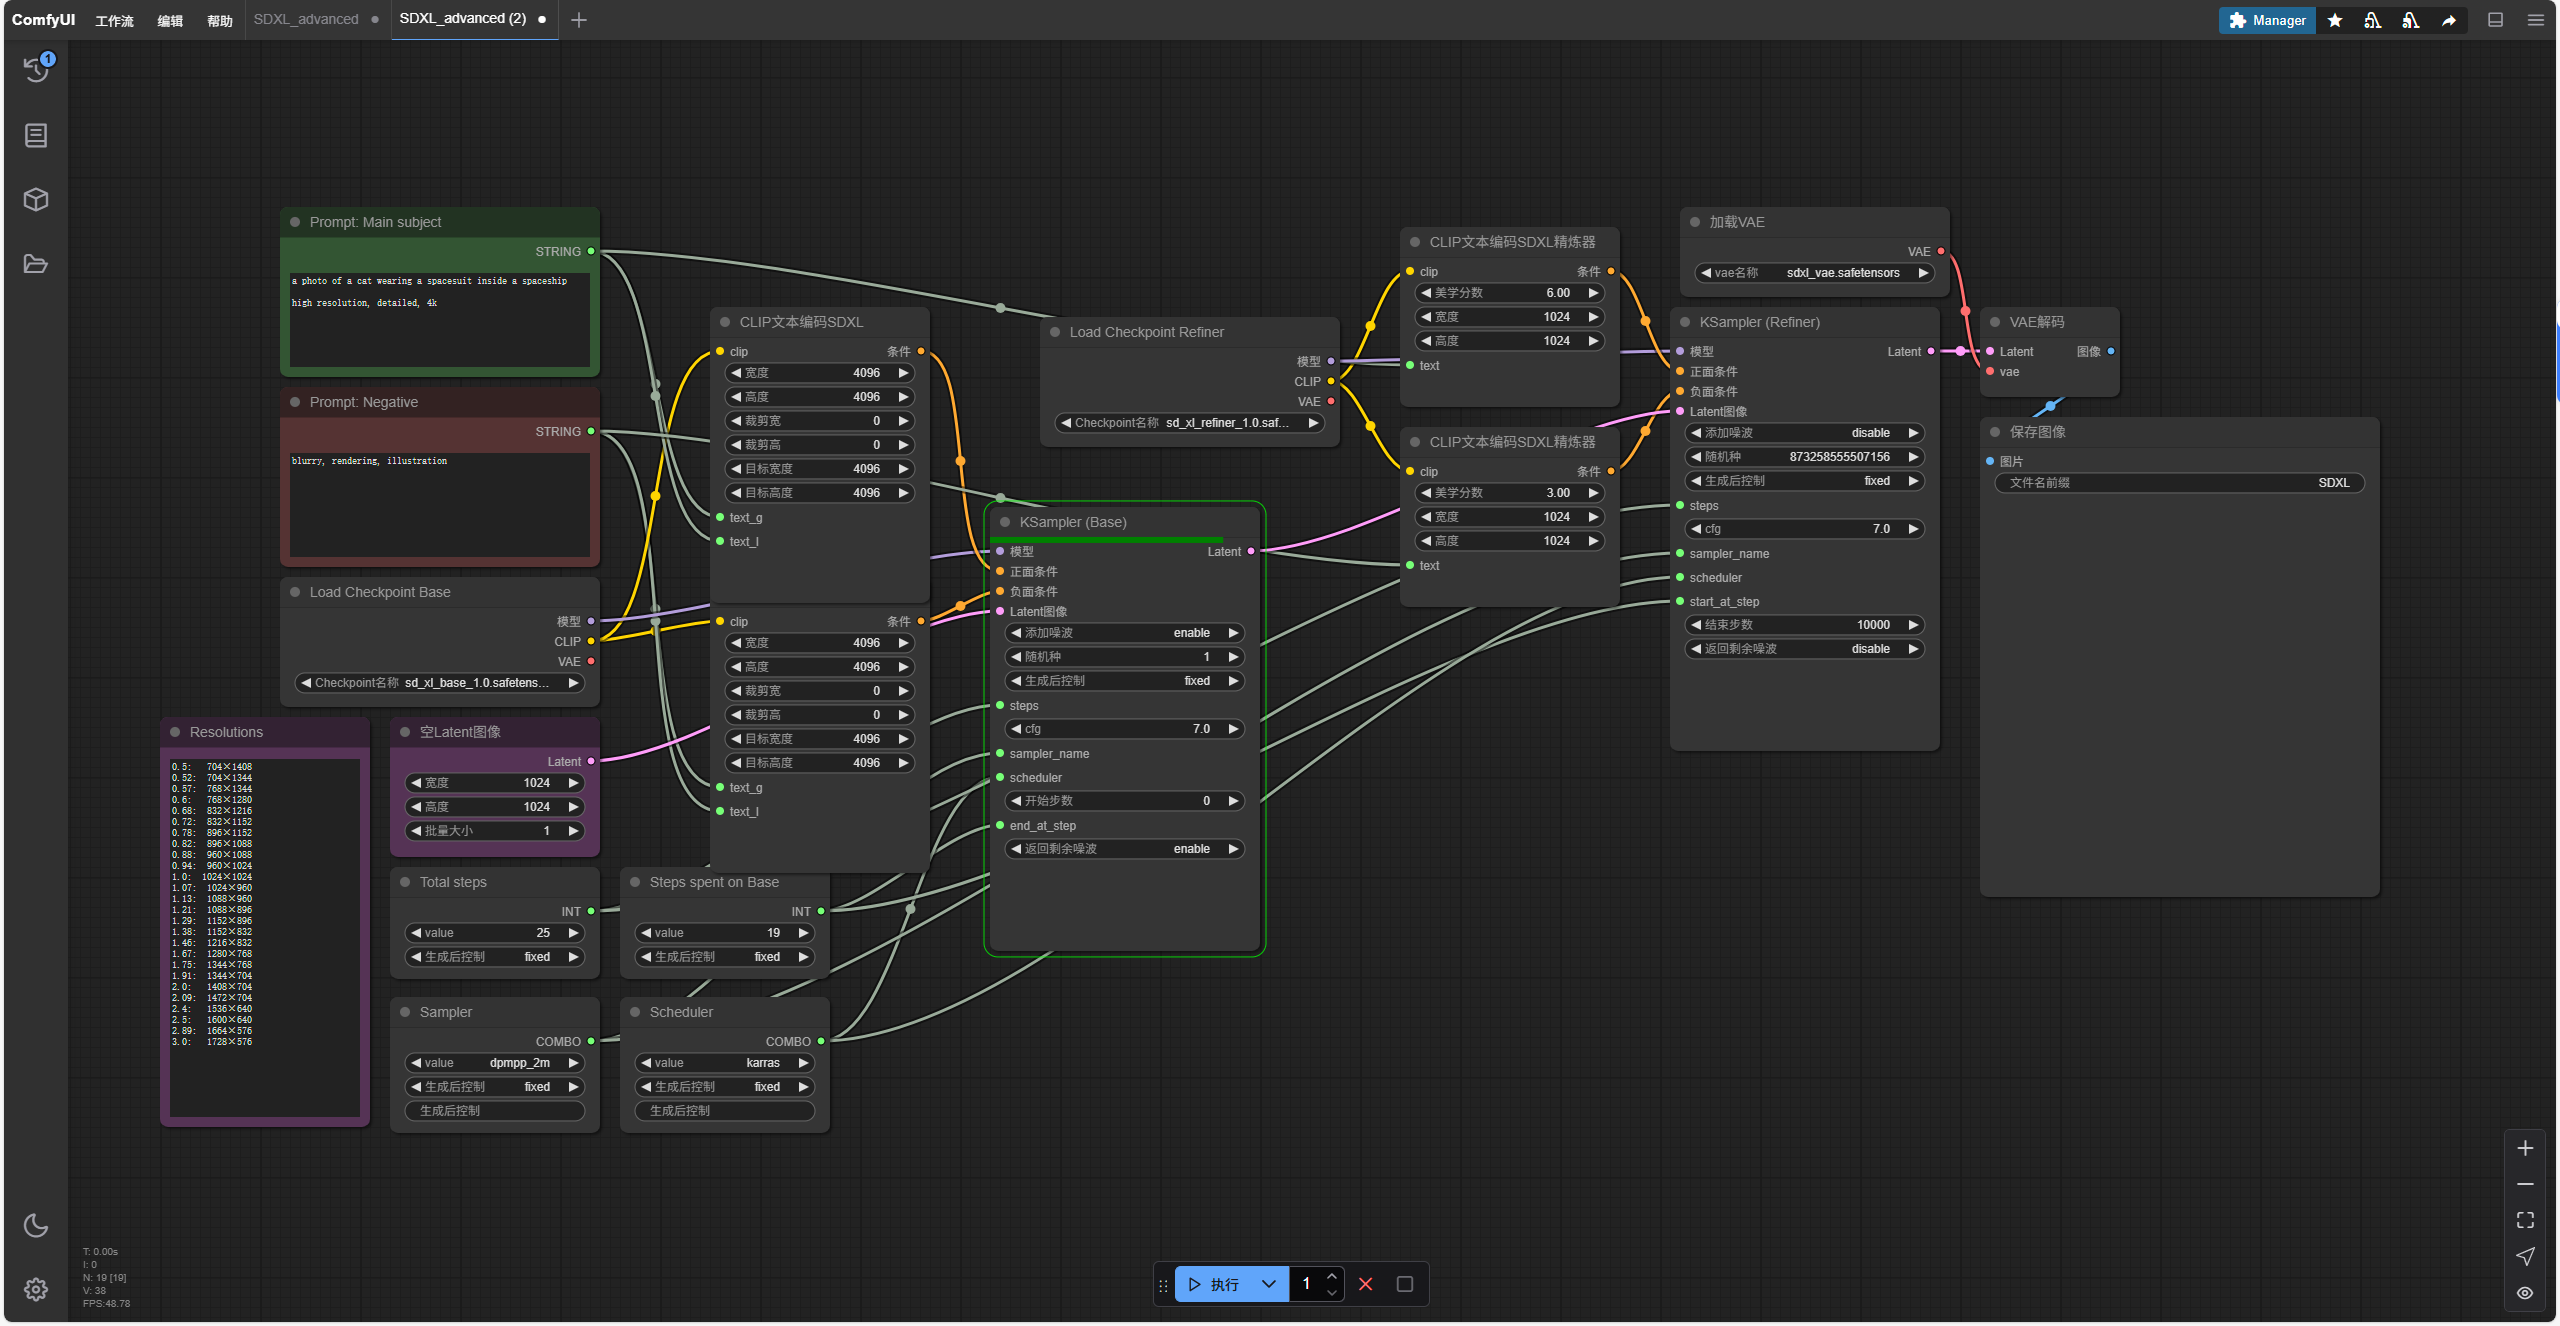
1. 下载编译jetson-container环境
git clone https://github.com/dusty-nv/jetson-containers.git
cd jetson-containersbash
jetson-containers/install.sh
2. 拉取docker镜像并运行
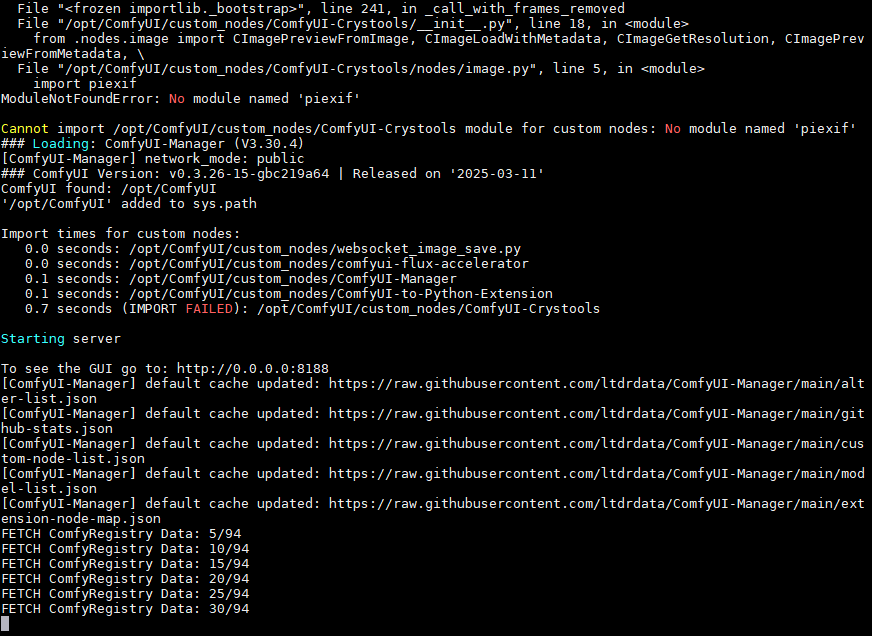
jetson-containers run dustynv/comfyui:r36.4.33. 成功运行后命令行窗口输出如下
4. 打开对应服务的GUI网页
若在Jetson设备上打开则访问 http://0.0.0.0:8188
若在局域网内的其他设备则输入 http://<jetson设备IP>:8188
5. 设定映射路径,将开发板里下载好的模型映射到容器内部目录
jetson-containers run ~/models/:/opt/ComfyUI/models/checkpoints dustynv/comfyui:r36.4.36. 按照需求搭建工作流并调整参数生成图像

关于ComfyUI的使用教程请参考其官网 ComfyUI | 用AI生成视频、图像、音频