
GPIO Control
GPIO (General-purpose input/output) is a general-purpose input/output interface whose pins can be programmed by the user and configured as input (GPI), output (GPO), or bidirectional (GPIO).
The 40-pin GPIO pinout of the Jetson Orin Nano series is shown below:
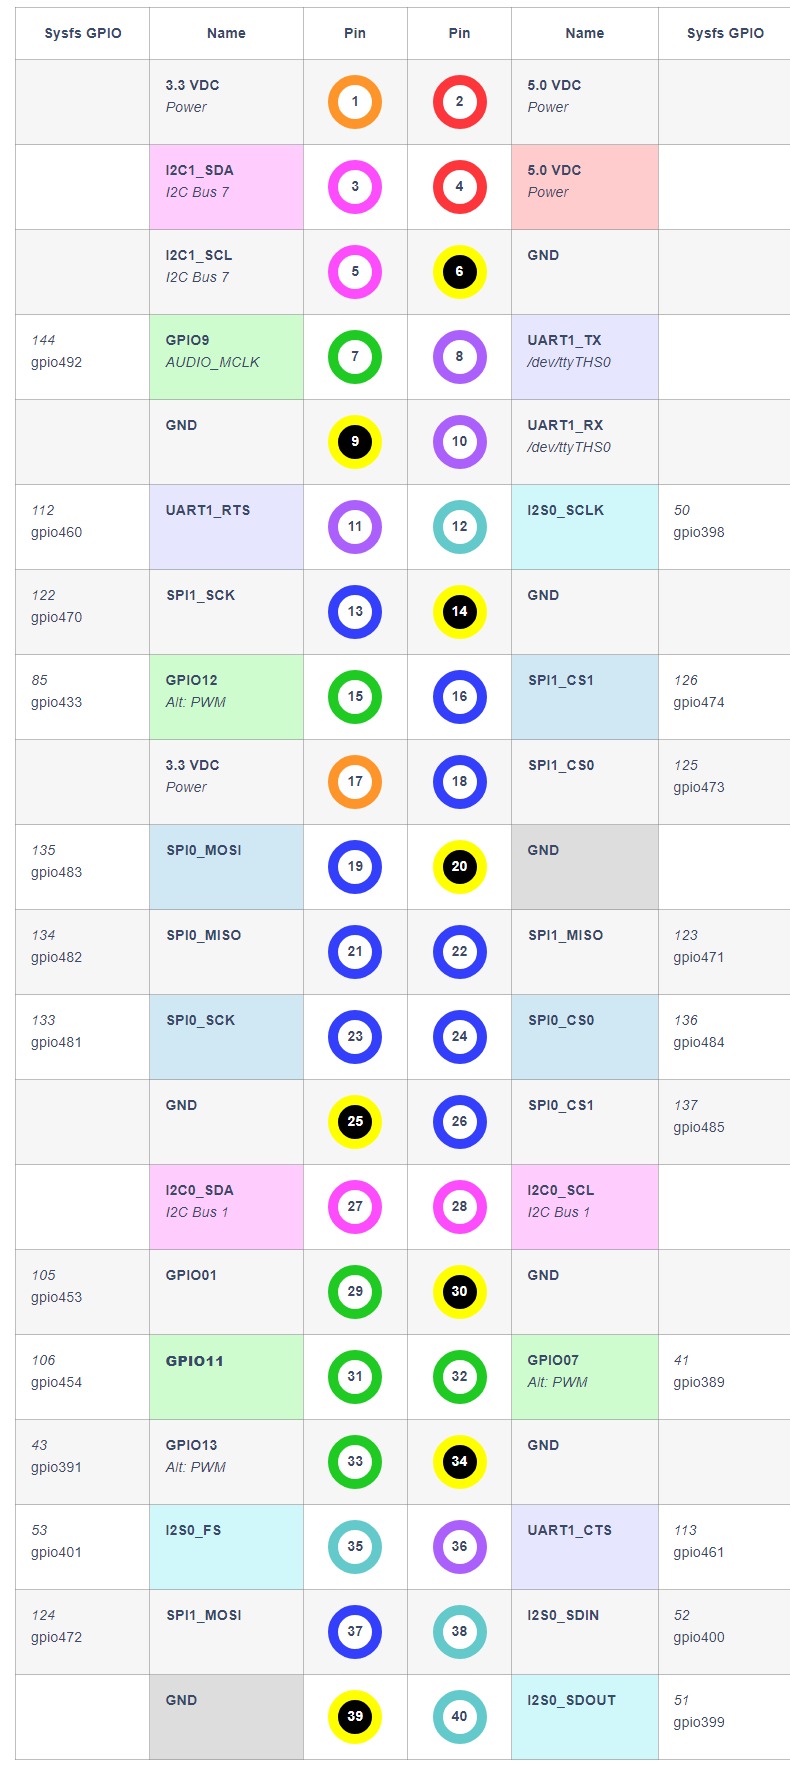
1. Using GPIO on JetPack 5
1.1 Controlling GPIO from the Command Line
Take pin 31 as an example (GPIO number 454, pin name PQ.06):
Elevate to root privileges and enable the GPIO:
sudo bash
echo 454 > /sys/class/gpio/export
Set the GPIO to input mode:
echo in > /sys/class/gpio/PQ.06/directionRead the current GPIO state (1 = high, 0 = low):
cat /sys/class/gpio/PQ.06/valueSet the GPIO to output mode:
echo out > /sys/class/gpio/PQ.06/directionSet the output level:
echo 1 > /sys/class/gpio/PQ.06/value  # high
echo 0 > /sys/class/gpio/PQ.06/value  # low
Blink test script:
#!/bin/bash
trap 'echo PQ.06 > /sys/class/gpio/unexport; echo "GPIO PQ.06 is released"' EXIT

echo "setting GPIO PQ.06"
echo PQ.06 > /sys/class/gpio/export 2>/dev/null
echo out > /sys/class/gpio/PQ.06/direction

while true; do
    echo 0 > /sys/class/gpio/PQ.06/value
    sleep 0.5
    cat /sys/class/gpio/PQ.06/value
    sleep 0.5
    echo 1 > /sys/class/gpio/PQ.06/value
    sleep 0.5
    cat /sys/class/gpio/PQ.06/value
    sleep 0.5
done
1.2 Controlling GPIO with Python
Install the Jetson.GPIO library:
pip install Jetson.GPIOThe Jetson GPIO library provides four pin numbering modes:
| Mode | Description |
|---|---|
BOARD | Physical pin numbers (40-pin header order) |
BCM | Broadcom SoC GPIO numbers |
CVM | CVM/CVB connector signal names |
TEGRA_SOC | Tegra SoC signal names |
Example code:
import time
import RPi.GPIO as GPIO

output_pin = 31  # BOARD mode

GPIO.setmode(GPIO.BOARD)
GPIO.setup(output_pin, GPIO.OUT)

print("Press CTRL+C to exit")
curr_value = GPIO.HIGH
try:
    while True:
        time.sleep(1)
        print("pin {} now is {}".format(output_pin, curr_value))
        GPIO.output(output_pin, curr_value)
        curr_value ^= GPIO.HIGH  # blink
finally:
    GPIO.cleanup()
For more usage, refer to the official project page
1.3 Controlling GPIO with C/C++
Install libgpiod-dev:
sudo apt install libgpiod-devReference example:
#include <stdio.h>
#include <stdlib.h>
#include <unistd.h>
#include <gpiod.h>

#define GPIO_CHIP   "/dev/gpiochip0"
#define GPIO_LED    3

int main() {
    struct gpiod_chip *gpiochip = gpiod_chip_open(GPIO_CHIP);
    struct gpiod_line *gpioline = gpiod_chip_get_line(gpiochip, GPIO_LED);

    // Set gpio direction...
    gpiod_chip_close(gpiochip);
    return 0;
}
Compile and run:
g++ test_gpio.cc -o test_gpio -lgpiod
./test_gpio
2. Using GPIO on JetPack 6
In JetPack 6.2/r36.4.3, NVIDIA removed the legacy sysfs GPIO interface (
/sys/class/gpio). The recommended approach is to manage GPIOs via the unified Linux libgpiod framework.
2.1 Controlling GPIO with libgpiod
Install the prerequisite packages:
sudo apt-get install busybox automake autoconf libtoolVerify the installation:
gpioinfoRead the GPIO state:
gpioget $(gpiofind "PQ.06")Set the GPIO to output mode (runtime pinmux):
sudo busybox devmem 0x2430070 w 0x004Register addresses for each pin can be found in the NVIDIA official documentation
Hold the pin high:
gpioset --mode=wait `gpiofind "PQ.06"`=1Hold the pin low:
gpioset --mode=wait `gpiofind "PQ.06"`=02.2 Controlling GPIO with Python
On JetPack 6, you must first modify the register to change the pin to GPIO mode:
sudo busybox devmem 0x2430070 w 0x004Install/reinstall Jetson.GPIO:
sudo rm -rf /usr/lib/python3*/dist-packages/Jetson
sudo rm -rf /usr/local/lib/python3*/dist-packages/Jetson
git clone https://github.com/NVIDIA/jetson-gpio.git
cd jetson-gpio
sudo pip3 install .
The Python API is the same as on JetPack 5; see section 1.2.
2.3 Controlling GPIO with C/C++
First set the pinmux:
sudo busybox devmem 0x2430070 w 0x004sudo apt install libgpiod-devThe code is the same as on JetPack 5. The GPIO line number must be looked up from gpioinfo (e.g. PQ.06 = line 106).
Pinout Reference
See the Orin Nano/NX GPIO Tutorial for the complete pin mapping and PADCTL register addresses.