
Install and use PyTorch and torchvision
PyTorch is one of the most popular and easy-to-use deep learning frameworks in Python. It allows developers to design and train complex neural network models as intuitively and flexibly as writing ordinary Python code. Its clean API design and powerful GPU acceleration support make the development process — from research ideas to actual deployment — extremely efficient and convenient, which is why it is widely favored by developers.
NVIDIA provides packages specifically adapted for the Jetson series of devices. Their version dependencies are as follows:
| PyTorch Version | NVIDIA Framework Container | NVIDIA Framework Wheel | JetPack Version |
|---|---|---|---|
| 2.8.0a0+5228986c39 | 25.06 | - | 6.2 |
| 2.8.0a0+5228986c39 | 25.05 | - | 6.2 |
| 2.7.0a0+79aa17489c | 25.04 | - | 6.2 |
| 2.7.0a0+7c8ec84dab | 25.03 | - | 6.2 |
| 2.7.0a0+6c54963f75 | 25.02 | - | 6.2 |
| 2.6.0a0+ecf3bae40a | 25.01 | - | 6.1 |
| 2.6.0a0+df5bbc09d1 | 24.12 | - | 6.1 |
| 2.6.0a0+df5bbc0 | 24.11 | - | 6.1 |
| 2.5.0a0+e000cf0ad9 | 24.10 | - | 6.1 |
| 2.5.0a0+b465a5843b | 24.09 | 24.09 | 6.1 |
| 2.5.0a0+872d972e41 | 24.08 | - | 6.0 |
| 2.4.0a0+3bcc3cddb5 | 24.07 | 24.07 | 6.0 |
| 2.4.0a0+f70bd71a48 | 24.06 | 24.06 | 6.0 |
| 2.4.0a0+07cecf4168 | 24.05 | 24.05 | 6.0 |
| 2.3.0a0+6ddf5cf85e | 24.04 | 24.04 | 6.0 Developer Preview |
| 2.3.0a0+40ec155e58 | 24.03 | 24.03 | 6.0 Developer Preview |
| 2.3.0a0+ebedce2 | 24.02 | 24.02 | 6.0 Developer Preview |
| 2.2.0a0+81ea7a4 | 23.12, 24.01 | 23.12, 24.01 | 6.0 Developer Preview |
| 2.2.0a0+6a974bec | 23.11 | 23.11 | 6.0 Developer Preview |
| 2.1.0a | 23.06 | 5.1.x | |
| 2.0.0 | 23.05 | 5.1.x | |
| 2.0.0a0+fe05266f | 23.04 | 5.1.x | |
| 2.0.0a0+8aa34602 | 23.03 | 5.1.x | |
| 1.14.0a0+44dac51c | 23.02, 23.01 | 5.1.x | |
| 1.13.0a0+936e930 | 22.11 | 5.0.2 | |
| 1.13.0a0+d0d6b1f | 22.09, 22.10 | 5.0.2 | |
| 1.13.0a0+08820cb | 22.07 | 22.07 | 5.0.2 |
| 1.13.0a0+340c412 | 22.06 | 22.06 | 5.0.1 |
| 1.12.0a0+8a1a93a9 | 22.05 | 22.05 | 5.0 |
| 1.12.0a0+bd13bc66 | 22.04 | 5.0 | |
| 1.12.0a0+2c916ef | 22.03 | 5.0 | |
| 1.11.0a0+bfe5ad28 | 22.01 | 4.6.1 |
The tutorial below uses JetPack 6.2.1 with CUDA 12.6 as an example
1. Install the torch packages
1.1 Download and install torch and torchvision
wget https://pypi.jetson-ai-lab.io/jp6/cu126/+f/62a/1beee9f2f1470/torch-2.8.0-cp310-cp310-linux_aarch64.whl
wget https://pypi.jetson-ai-lab.io/jp6/cu126/+f/907/c4c1933789645/torchvision-0.23.0-cp310-cp310-linux_aarch64.whl
pip install torch-2.8.0-cp310-cp310-linux_aarch64.whl torchvision-0.23.0-cp310-cp310-linux_aarch64.whl -i https://pypi.tuna.tsinghua.edu.cn/simple
1.2 Check whether the installation is correct
Execute the following three statements with python
jetson@jetson-desktop:~$ python
Python 3.10.16 (main, Dec 11 2024, 16:18:56) [GCC 11.2.0] on linux
Type "help", "copyright", "credits" or "license" for more information.
>>> import torch
>>> print(torch.__version__)
2.8.0
>>> print(torch.cuda.is_available())
True
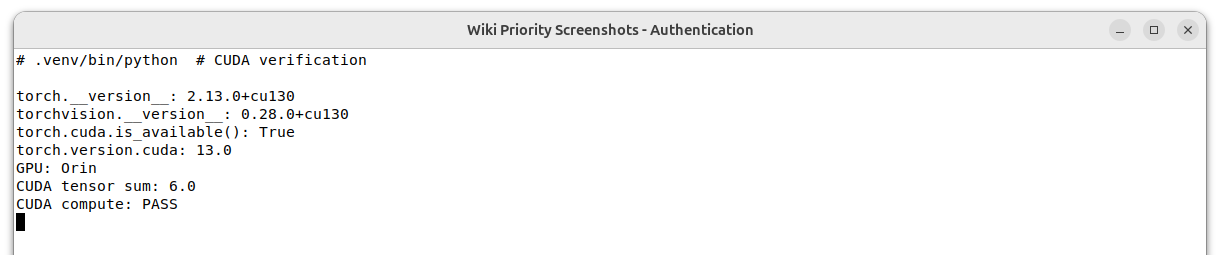
Example from a JetPack 7.2.1 system, including a minimal CUDA tensor operation in addition to the version checks:
2. Run YOLO11
YOLO is a real-time object detection algorithm. It treats object detection as a single-stage regression problem by dividing an image into a grid and directly predicting bounding boxes and class probabilities, achieving high-speed and high-accuracy detection. Thanks to being open source, easy to use, and flexible to deploy, the YOLO family is widely used in fields such as autonomous driving, security surveillance, and industrial quality inspection.
2.1 Install miniconda
curl -L https://repo.anaconda.com/miniconda/Miniconda3-py310_25.3.1-1-Linux-aarch64.sh | bash
source ~/.bashrc
conda --version
2.2 Switch conda to a mirror source
conda config --add channels https://mirrors.ustc.edu.cn/anaconda/pkgs/main/
conda config --add channels https://mirrors.ustc.edu.cn/anaconda/pkgs/free/
conda config --add channels https://mirrors.ustc.edu.cn/anaconda/cloud/conda-forge/
conda config --add channels https://mirrors.ustc.edu.cn/anaconda/cloud/msys2/
conda config --set show_channel_urls yes
2.3 Create a conda environment
conda create -n jetson-ai python=3.102.4 Enter the conda environment
conda activate jetson-ai2.5 Install torch and torchvision
wget https://pypi.jetson-ai-lab.io/jp6/cu126/+f/62a/1beee9f2f1470/torch-2.8.0-cp310-cp310-linux_aarch64.whl
wget https://pypi.jetson-ai-lab.io/jp6/cu126/+f/907/c4c1933789645/torchvision-0.23.0-cp310-cp310-linux_aarch64.whl
pip install torch-2.8.0-cp310-cp310-linux_aarch64.whl torchvision-0.23.0-cp310-cp310-linux_aarch64.whl -i https://pypi.tuna.tsinghua.edu.cn/simple
2.6 Install ultralytics
pip install ultralytics -i https://pypi.tuna.tsinghua.edu.cn/simple2.7 Run the camera video inference example
Connect a camera and run the following program in the environment created above.
import cv2
import time
from ultralytics import YOLO
from ultralytics import YOLOWorld

# Load the YOLO model
model = YOLO("yolo11s.pt")

# Open the video file
video_path = 0
cap = cv2.VideoCapture(video_path)

# Loop through the video frames
while cap.isOpened():

    # Read a frame from the video
    success, frame = cap.read()
    start = time.time()
    if success:
        # Run YOLO inference on the frame
        results = model(frame)
        inf_time = time.time() - start
        # Visualize the results on the frame
        annotated_frame = results[0].plot()
        fps = 1.0 / inf_time if inf_time > 0 else 0
        # show FPS
        cv2.putText(annotated_frame, f"FPS: {fps:.2f}", (10, 30), cv2.FONT_HERSHEY_SIMPLEX, 1, (0,255,0), 2)
        cv2.imshow("YOLO Inference", annotated_frame)

        # Break the loop if 'q' is pressed
        if cv2.waitKey(1) & 0xFF == ord("q"):
            break
    else:
        # Break the loop if the end of the video is reached
        break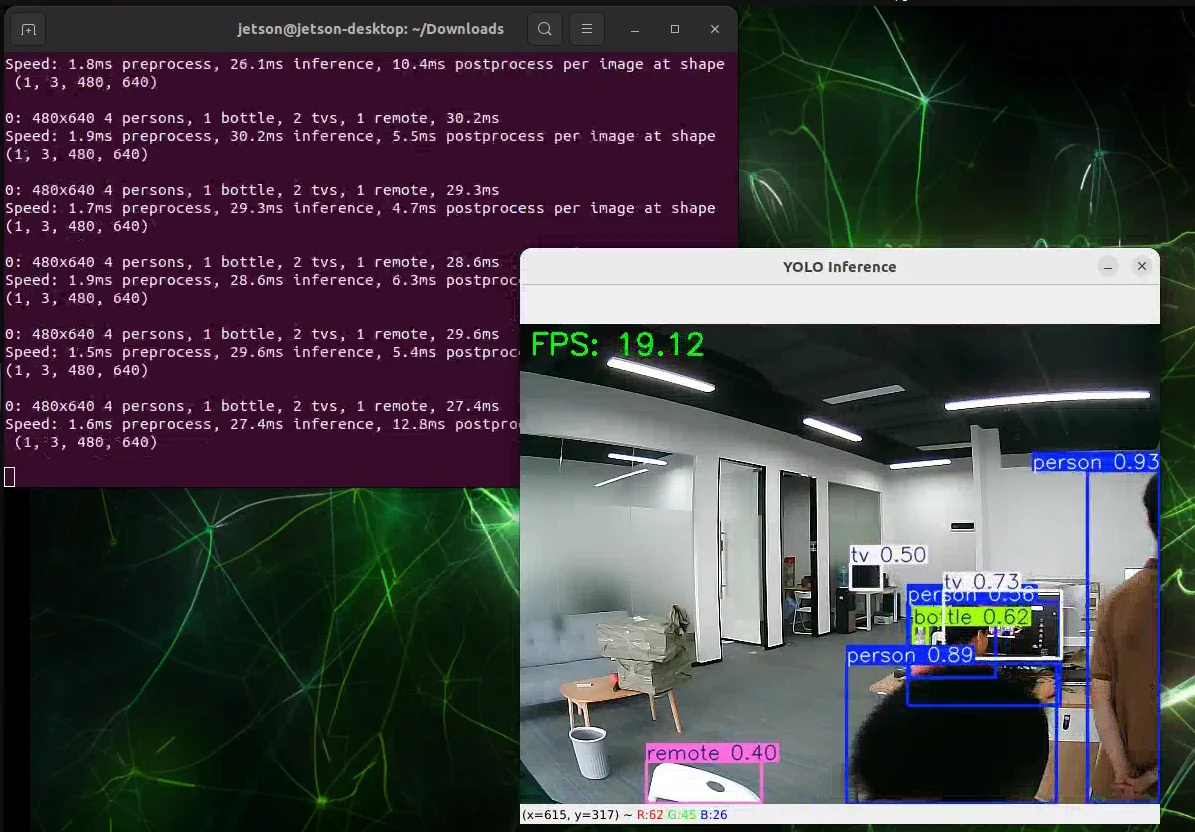
For more information, see Ultralytics YOLO11 - Ultralytics YOLO Docs