
USB Configuration
1. Jetson Orin Nano Configuration
1. JetPack 5.1.5 Configuration
1.1 Flash the JetPack 5.1.5 System
Refer to the official firmware flashing guide
1.2 Download the Device Tree File to the Board
After the device boots normally, open a terminal and download the modified device tree file to the board.
git clone https://gitee.com/kongyuantech/document.git
cd document/AN002\ Orin\ Nano\ NX\ USB配置/5.1.4/
1.3 Replace the Device Tree from the Command Line
Run the following commands to replace the DTB device tree file and reboot the device.
- Jetson Orin Nano 4G: use the following commands
sudo cp /boot/dtb/kernel_tegra234-p3767-0004-p3768-0000-a0.dtb /boot/dtb/kernel_tegra234-p3767-0004-p3768-0000-a0.dtb.backup # back up the original DTB file
sudo cp kernel_tegra234-p3767-0004-p3768-0000-a0.dtb /boot/dtb
sudo chown 0:0 /boot/dtb/kernel_tegra234-p3767-0004-p3768-0000-a0.dtb
sudo chmod 644 /boot/dtb/kernel_tegra234-p3767-0004-p3768-0000-a0.dtb
sudo reboot- Jetson Orin Nano 8G: use the following commands
sudo cp /boot/dtb/kernel_tegra234-p3767-0003-p3768-0000-a0.dtb /boot/dtb/kernel_tegra234-p3767-0003-p3768-0000-a0.dtb.backup # back up the original DTB file
sudo cp kernel_tegra234-p3767-0003-p3768-0000-a0.dtb /boot/dtb
sudo chown 0:0 /boot/dtb/kernel_tegra234-p3767-0003-p3768-0000-a0.dtb
sudo chmod 644 /boot/dtb/kernel_tegra234-p3767-0003-p3768-0000-a0.dtb
sudo reboot
2. JetPack 6.2.1 Configuration
2.1 Flash the JetPack 6.2.1 System
Refer to the official firmware flashing guide
2.2 Download the Device Tree File to the Board
After the device boots normally, open a terminal and download the modified device tree file to the board.
git clone https://gitee.com/kongyuantech/document.git
cd document/AN002\ Orin\ Nano\ NX\ USB配置/6.2/
2.3 Replace the Device Tree from the Command Line
Run the following commands to add the DTB device tree file and reboot the device.
- Jetson Orin Nano 4G: run the following commands
sudo cp orin_nano_4g.dtb /boot/dtb
sudo sed -i 's#console=tty0#console=tty0\n      FDT /boot/dtb/orin_nano_4g.dtb#g' /boot/extlinux/extlinux.conf
sudo reboot- Jetson Orin Nano 8G: run the following commands
sudo cp orin_nano_8g.dtb /boot/dtb
sudo sed -i 's#console=tty0#console=tty0\n      FDT /boot/dtb/orin_nano_8g.dtb#g' /boot/extlinux/extlinux.conf
sudo reboot
2. Jetson Orin NX Configuration
1. JetPack 5.1.5 Configuration
1.1 Flash the JetPack 5.1.5 System
Refer to the official firmware flashing guide
1.2 Download the Device Tree File to the Board
After the device boots normally, open a terminal and download the modified device tree file to the board.
git clone https://gitee.com/kongyuantech/document.git
cd document/AN002\ Orin\ Nano\ NX\ USB配置/5.1.4/
1.3 Replace the Device Tree from the Command Line
Run the following commands to replace the DTB device tree file and reboot the device.
- Jetson Orin NX 8G: run the following commands
sudo cp /boot/dtb/kernel_tegra234-p3767-0001-p3768-0000-a0.dtb /boot/dtb/kernel_tegra234-p3767-0001-p3768-0000-a0.dtb.backup # back up the original DTB file
sudo cp kernel_tegra234-p3767-0001-p3768-0000-a0.dtb /boot/dtb
sudo chown 0:0 /boot/dtb/kernel_tegra234-p3767-0001-p3768-0000-a0.dtb
sudo chmod 644 /boot/dtb/kernel_tegra234-p3767-0001-p3768-0000-a0.dtb
sudo reboot- Jetson Orin NX 16G: run the following commands
sudo cp /boot/dtb/kernel_tegra234-p3767-0000-p3768-0000-a0.dtb /boot/dtb/kernel_tegra234-p3767-0000-p3768-0000-a0.dtb.backup # back up the original DTB file
sudo cp kernel_tegra234-p3767-0000-p3768-0000-a0.dtb /boot/dtb
sudo chown 0:0 /boot/dtb/kernel_tegra234-p3767-0000-p3768-0000-a0.dtb
sudo chmod 644 /boot/dtb/kernel_tegra234-p3767-0000-p3768-0000-a0.dtb
sudo reboot
2. JetPack 6.2.1 Configuration
2.1 Flash the JetPack 6.2.1 System
Refer to the official firmware flashing guide
2.2 Download the Device Tree File to the Board
After the device boots normally, open a terminal and download the modified device tree file to the board.
git clone https://gitee.com/kongyuantech/document.git
cd document/AN002\ Orin\ Nano\ NX\ USB配置/6.2/
2.3 Replace the Device Tree from the Command Line
Run the following commands to add the DTB device tree file and reboot the device.
- Jetson Orin NX 8G: use the following commands
sudo cp orin_nx_8g.dtb /boot/dtb
sudo sed -i 's#console=tty0#console=tty0\n      FDT /boot/dtb/orin_nx_8g.dtb#g' /boot/extlinux/extlinux.conf
sudo reboot- Jetson Orin NX 16G: use the following commands
sudo cp orin_nx_16g.dtb /boot/dtb
sudo sed -i 's#console=tty0#console=tty0\n      FDT /boot/dtb/orin_nx_16g.dtb#g' /boot/extlinux/extlinux.conf
sudo reboot
3. JetPack 7.2.1 Configuration (Orin Nano/NX)
JetPack 7.2.1 (Jetson Linux R39.2.1) can use the same module-specific DTB files provided above for JetPack 6.2.1:
| Module | DTB file |
|---|---|
| Jetson Orin Nano 4GB | orin_nano_4g.dtb |
| Jetson Orin Nano 8GB | orin_nano_8g.dtb |
| Jetson Orin NX 8GB | orin_nx_8g.dtb |
| Jetson Orin NX 16GB | orin_nx_16g.dtb |
1. Download the Device Tree File
git clone https://gitee.com/kongyuantech/document.git
cd document/AN002\ Orin\ Nano\ NX\ USB配置/6.2/
2. Install the DTB and Configure the Boot Entry
JetPack 7 boots through UEFI, but NVIDIA Jetson Linux R39.2 still supports selecting a custom kernel DTB with the FDT tag in /boot/extlinux/extlinux.conf. The following procedure changes only the LABEL primary entry. It does not match or rewrite the long APPEND line, so ${cbootargs}, root=PARTUUID=..., and all other kernel arguments remain unchanged.
Set the filename for the installed module first. This example uses an Orin Nano 8GB:
usb_dtb_file=orin_nano_8g.dtb
test -f "$usb_dtb_file" || { echo "Cannot find $usb_dtb_file"; exit 1; }

# Install the DTB and make a timestamped backup of the current boot configuration
sudo install -m 0644 "$usb_dtb_file" "/boot/dtb/$usb_dtb_file"
sudo cp -a /boot/extlinux/extlinux.conf \
  "/boot/extlinux/extlinux.conf.backup-$(date +%Y%m%d-%H%M%S)"

# Add FDT only to LABEL primary, or replace FDT if it is already present
sudo awk -v fdt="/boot/dtb/$usb_dtb_file" '
  function add_fdt() {
    if (in_primary && !fdt_written) {
      print "      FDT " fdt
      fdt_written = 1
    }
  }
  /^LABEL[[:space:]]+primary[[:space:]]*$/ {
    in_primary = 1
    fdt_written = 0
    print
    next
  }
  in_primary && /^LABEL[[:space:]]+/ {
    add_fdt()
    in_primary = 0
  }
  in_primary && /^[[:space:]]*FDT[[:space:]]+/ {
    if (!fdt_written) {
      print "      FDT " fdt
      fdt_written = 1
    }
    next
  }
  { print }
  END { add_fdt() }
' /boot/extlinux/extlinux.conf | sudo tee /boot/extlinux/extlinux.conf.new >/dev/null

# Inspect the generated entry before installing it; APPEND must remain unchanged
sudo grep -A8 -E '^LABEL[[:space:]]+primary$' /boot/extlinux/extlinux.conf.new
sudo grep -qE "^[[:space:]]+FDT[[:space:]]+/boot/dtb/${usb_dtb_file}$" \
  /boot/extlinux/extlinux.conf.new && \
  sudo install -m 0644 /boot/extlinux/extlinux.conf.new /boot/extlinux/extlinux.conf || \
  { echo "FDT validation failed; extlinux.conf was not modified"; exit 1; }
sudo rm -f /boot/extlinux/extlinux.conf.new
sudo reboot
The resulting primary entry should resemble the following. Keep the original APPEND content from the device; never copy the example PARTUUID manually:
LABEL primary
      MENU LABEL primary kernel
      LINUX /boot/Image
      INITRD /boot/initrd
      APPEND ${cbootargs} root=PARTUUID=<keep the original value> rw ...
      FDT /boot/dtb/orin_nano_8g.dtb
WARNING
- The DTB must match the module memory size. A mismatched file can prevent boot or break peripherals.
- This procedure targets development systems without Secure Boot. With Secure Boot enabled, the DTB and
extlinux.confmay need to be signed again with the active keys. - Keep the backup until the new DTB has booted successfully. If it fails, restore the original
extlinux.confand DTB from another boot entry or Recovery mode.
NVIDIA reference: Jetson Linux R39.2 — UEFI Adaptation.
4. Verifying the Configuration
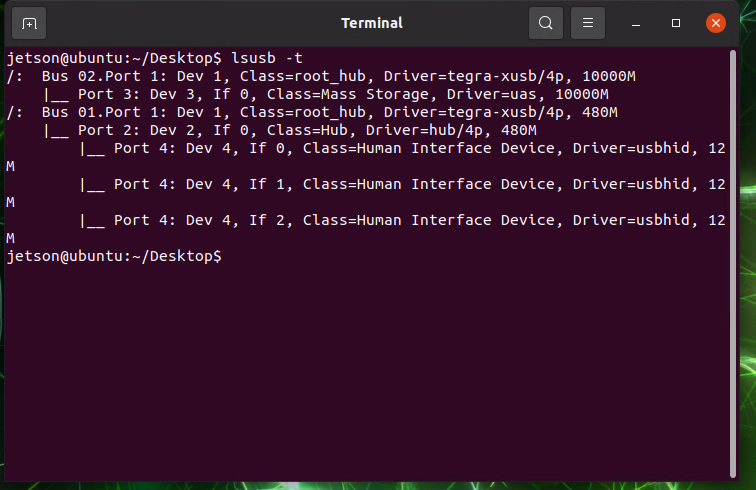
After replacing the device tree, all 4 USB 3.0 ports (3 on the C1901) work properly. The Type-C port is disabled by default. You can use the following command to check the status of the USB ports.
lsusb -t- Before replacing the device tree:
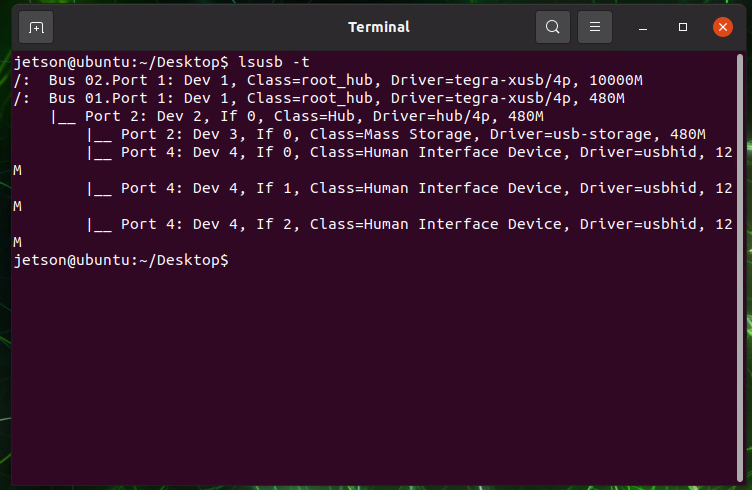
- After successfully replacing the device tree:
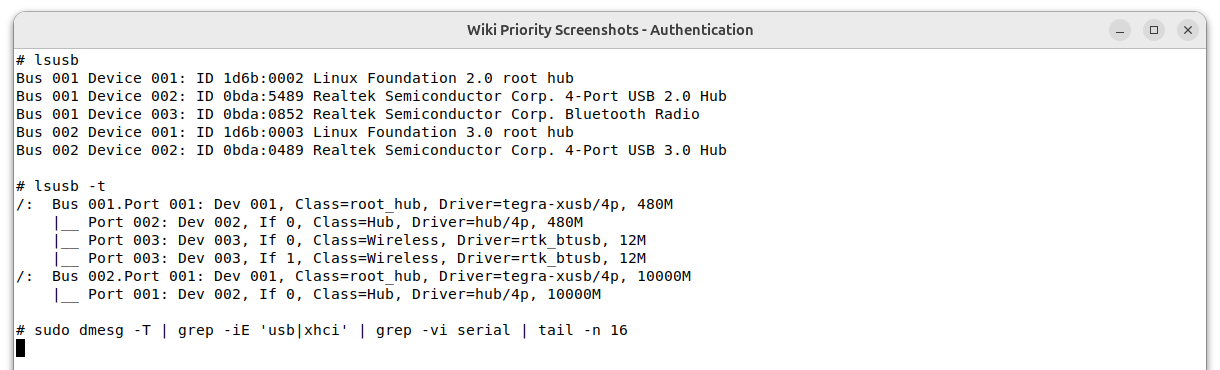
On the JetPack 7.2.1 system below, 5000M or 10000M indicates a SuperSpeed link. The USB 3.0 hub in this example has a 10000M upstream link:
You can also use the DISK tool or the dd command yourself to test whether the read/write speeds meet the USB 3.0 standard.
5. Configuring the Type-C Port Mode
- Configure the Type-C port as Device mode
Note: this command only enables the mode temporarily; it will be lost after a reboot.
sudo bash -c 'echo device > /sys/class/usb_role/usb2-0-role-switch/role'Once set, connecting the device to a PC host via the Type-C port provides the following functions:
COM port, the device's terminal command line
Virtual network interface, the device's default IP address is: 192.168.55.1
NCM (Network Control Model), the device can access the network through the PC host; only supported on Linux and Mac
Configure the Type-C port as Device mode by default at boot (permanent)
sudo sed -i 's#exit 0#echo device > /sys/class/usb_role/usb2-0-role-switch/role\nexit 0#g' /opt/nvidia/l4t-usb-device-mode/nv-l4t-usb-device-mode-start.sh